For the past far too many months, I have had back problems that have been keeping me out of the shop. Well, time well spent with the doctor, and some physical therapy, and I am back in the shop!
Currently I have a couple of basic glue ups in the clamps for Christmas gifts. As soon as they come out of the clamps, they go to the lathe!
Yep, that's right, turning projects, pretty simple actually for several functional projects.
The material used is regular home center 2x4 southern yellow pine that has been acclimating to my shop for the last 4 years or so. I simply planed 3 chunks smooth and parallel with my Ryobi AP1301 planer, and then went on to clamp them up.
Next step is to clip the ends smooth and square on the miter saw, and find center. The corners of the work pieces will be knocked off in 45 degree angles to I start with long octagons, The reasoning for that is that it will take FAR less time, effort, and wear and tear on me, the lathe, and the gouges to start with. I will have far less material to remove on the lathe basically. Not to mention it is a LOT easier to clean up afterwards.
Once I get the first one turned, I will use the lessons learned from that, and duplicate this 3 more times.
Welcome to my tale of setting up and working in my regular guys workshop. Hopefully you will get something out of your time here! #Woodworking, #HomeImprovement, #Dustcollection, #Therapy, #ToolTime
17 October, 2015
10 April, 2015
Her wish is my command....
So as I was plodding through my evening tonight, I was going to take the Jazz bass to my brother in law, an Auto Body / Paint guy that does a lot of color matching to see if maybe he could whip up a color match of the Burgundy Mist for refinishing the headstock when I was somewhat abrubtly instructed to leave it maple... It would appear she likes the contrast... So no paint on the headstock for this project! Still going to swap out the J-Bass decal for a Jazz Bass decal though. I HATE that truncated name!
Work progress on customizing the Squier Jazz Bass..
I have been flooded with other work, but I am squeezing work on the Jazz Bass in to the few mere moments I can spend in the shop. I am making a bit of progress. I am starting off with the pickups, and have shielded them, first off, I line the top of the pickup cover with the copper foil tape, and make my clean holes for the magnets, insuring there is NO foil in the hole or anywhere it can touch the magnets or any wire...

The next step is to size the foil tape, and wrap the pickup itself in the copper foil tape, again such that it doesn't touch magnets, wire, or solder joints...

And next, wrap tape 1/2" into the inside of the pickup cover, and around the mount lugs of the pickup cover such that when the pickup is inserted into the cover, the conductive side of the tape on the inside of the cover, the mount lug pieces, and the pickup itself are in full contact, making for full continuity.

So now my Duncan Designed Vintage Modified pickups are ready to be installed. I verified the specs with Seymour Duncan site, and measured the resistance and I am spot on, these SHOULD work perfectly when installed!
Next step, shield the inside of the cavities!
My original plan was to copper foil tape the cavities, however with the difficulties I had just getting the foil into the pickup covers, I am leaning HEAVILY toward conductive paint.I found a REALLY good one that is getting rave reviews from the HAM radio guys, guitar guys, and electronic hobbyists... I put it in my Amazon store to make finding the product easier for you! It's MG Chemicals 838 Carbon Conductive Coating. Price is pretty good, and it works super pro...
The next step is to size the foil tape, and wrap the pickup itself in the copper foil tape, again such that it doesn't touch magnets, wire, or solder joints...
Next step, shield the inside of the cavities!
My original plan was to copper foil tape the cavities, however with the difficulties I had just getting the foil into the pickup covers, I am leaning HEAVILY toward conductive paint.I found a REALLY good one that is getting rave reviews from the HAM radio guys, guitar guys, and electronic hobbyists... I put it in my Amazon store to make finding the product easier for you! It's MG Chemicals 838 Carbon Conductive Coating. Price is pretty good, and it works super pro...
06 April, 2015
The work on the Saturn continues! Starting a fun project. Hot rodding a cheap bass guitar!
I haven't posted up much about it because, well let's be honest, the rate of progress has been embarrassingly slow. The air conditioning compressor clutch needs a pulley puller to remove, that I KNEW I owned at one time, but appears in the intervening years to have sprouted legs and walked off. And that power steering pump. I got the pulley pressed off, and on the new one, swapped the tank, put a new O ring in, swapped the lines over, went to bolt the new pump assembly in place, and not all of the bolts line up quite right. I mean the holes are where they are supposed to be, I can feel them out with a screwdriver and it all seems to line up, but for some reason, the bottom and rear bolts just don't want to start... So progress continues, in fits and starts...
My wife and I have made great strides in getting the shop clean, including getting her nearly a dozen large flower pots, 3 huge bags of potting soil, and a wide assortment of various chairs, coolers, and other riffraff out of the shop. Sadly in the process, one of the rungs in the attic staircase gave up the ghost under my not inconsiderable weight. I removed it entirely and am going to use it as a template for a new, and much better model, including MUCH greater reinforcement to resist the downward force of my heft and the stuff going up and down the stairs! If you follow my progress on BT3Central / Sawdustzone you know I have been losing a considerable amount of weight following Dr. ordered weight loss plan.... So far so good, but so far to go!
In what free time I have outside of my studies, blogging here, working in the shop, etc... I also play the electric bass guitar. I have my heart set of getting good enough, and getting into a Praise and Worship team at my church. I am also a big Rush enthusiast, and deeply enjoy the work and sound of Geddy Lee. To that end, I have found that my older Ibanez PJ active basses just weren't up to the task, and my budget wasn't up to a Geddy Lee Signature Fender Jazz bass, not to mention I don't care for the look of black body / walnut neck. So a bit of reasearch into what I like, and a project is born....
I wanted something unique to me, which wasn't going to be easy, since I also wanted a Fender Jazz style bass. My budget dictated something dirt cheap, yet decent enough to mod properly...
That to my knowledge left 2 options. Squier by Fender, and SX basses. Being that Squier is a Fender product, and is pretty much just the bottom line of their product offerings, I opted to start there, with the low end of the totem pole model, the Affinity Series Jazz Bass, for several reasons. Budget would have allowed for a James Johnston Signature bass, but that instrument is based around an Agathis body, which tends to be too light, and neck dives, making the instrument harder for me to play, and it uses the Classic Vibe pickups which sound different from the Seymour Duncan provided "Duncan Designed" pickups from the Vintage Modified series. AND I wanted a unique color, specifically Burgundy Mist, a color Fender sourced from I believe it was either Buick or Oldsmobile in 1959. I have seen several Burgundy Mist Stratocasters in live performances, but never a bass... Although several can be seen online...
I know, it's sort of a pinkish, purplish color but it just looks so awesome in person, and honestly I have no problems with how I roll so to heck with people that are going to say it's a girly color... Hey if the girlies like it, then fine....

Now being that this is an Affinity series instrument it lacks the glossy neck finish which others like, but I prefer the silky satin finish of this neck, it features an Alder body, with just the right weight balance, and decent although not great pickups, they are serviceable...
I wanted to do some cosmetic modifications when I stumbled across a classified ad, and a problem... The problem, inherent in many Fender instruments, as well as many other brands, is that I was getting BAD, and I mean REALLY bad RF interference within the electronics, specifically the pickups and wiring, that I was getting a terrible buzzing only at certain times of day, when I played with my hands off of the strings and not touching metal such as when letting an open string ring out. I researched the problem and found a good number of Howto articles on shielding the cavities, and pickups that, well I had to do it.... At the same time, I found a set of the Duncan Designed Vintage Modified Jazz pickups in the classifieds for dirt cheap money... Well, like they say, combine need, with a desire to improve looks, and a project is born!
This bass, will be upgraded with...
#1. Full pickup cavity, and control cavity shielding. I haven't had the pick guard off yet, I know the bore for the wire between the bridge pickup and control cavity, and the bore for the bridge ground strap can't effectively be shielded, but pretty much everything else can. I will be using Corry's Slug And Snail repellent copper foil tape. I don't know for sure if the adhesive is conductive, reports conflict on that, I will test and post my results here on that...
#2. Swap pickups for the Duncan Designed pickups. They are in my possession and appear to have survived shipping okay... Will be shielding the pickups as well. The idea is NONE of the copper foil tape shielding should be visible...
#3. Swap out the pick guard. I selected a special pick guard that sadly has to ship from China, the measurements are spot on right, and if the photos are correct, the look is exactly what I am going for, very classy, and vintage looking.
#4. I despise standard Fender / Squier L metal bridge plates. They scream cheap, cheaper, cheapest. I sourced up a Squier Classic Vibe 60s 4 string High Mass cast bridge with brass saddles for dirt cheap money. Reports on these fitting properly conflict as well. They LOOK right, and SOME folks say they are a direct replacement bolt on piece, some say you need to fill and drill. I hae a small piece of 4/4 Alder a set of General Plug Cutters, and a bottle of Titebond III at the ready if I need to fill & drill... I mean lots of guys go with a string through type bridge so what's my little High Mass project compared to that?
#5. I will be color matching the headstock in the Burgundy Mist, adding an OEM type copy decal to keep the branding right, except I am going to have a minor change made, My current one says Squier by Fender J-Bass. I want the new one to say Squier by Fender Jazz Bass.The truncated print on the decal is a cost shaving measure, and a hokey as snot one... Once the paint and slide decal are "just so" I will be treating it to at least 3 coats of clear coat for the perfect finish!
#6. Lastly, I will be kicking the Fender OEM strings to the curb. Factory strings, particularly Factory Fender strings, are somewhat like factory table saw blades, good enough at first, but seriously lacking in performance or accuracy... I have a set of D'Addario XLNickel rounds in 45-100 that are spares for my Ibanezes, I plan on keeping the same strings on them all, so off with the Fenders, on with the D'Addarios...
All supplies for this project are either in my inventory, or on order being shipped in except for the paint and decals, I am trying to find the best sources for them...
Today, the Duncan Designed pickups arrived in the mail, used pull outs bought on the cheap, I wasn't expecting foam blocked and anti static everything, but I also wasn't expecting this sort of packaging either....

I somewhat concerned unpacked them and inspected the contents, it appears at least at this time, that the packaging was sufficient...

There was also included a bag of the hold down screws, and the foam blocks that bgo between the body and the pickups.
With any luck and a break in the other projects, you will be seeing some more photo posts of progress there, and with the growth in my skills there, maybe, just maybe, you'l hear some funky new theme music!
My wife and I have made great strides in getting the shop clean, including getting her nearly a dozen large flower pots, 3 huge bags of potting soil, and a wide assortment of various chairs, coolers, and other riffraff out of the shop. Sadly in the process, one of the rungs in the attic staircase gave up the ghost under my not inconsiderable weight. I removed it entirely and am going to use it as a template for a new, and much better model, including MUCH greater reinforcement to resist the downward force of my heft and the stuff going up and down the stairs! If you follow my progress on BT3Central / Sawdustzone you know I have been losing a considerable amount of weight following Dr. ordered weight loss plan.... So far so good, but so far to go!
In what free time I have outside of my studies, blogging here, working in the shop, etc... I also play the electric bass guitar. I have my heart set of getting good enough, and getting into a Praise and Worship team at my church. I am also a big Rush enthusiast, and deeply enjoy the work and sound of Geddy Lee. To that end, I have found that my older Ibanez PJ active basses just weren't up to the task, and my budget wasn't up to a Geddy Lee Signature Fender Jazz bass, not to mention I don't care for the look of black body / walnut neck. So a bit of reasearch into what I like, and a project is born....
I wanted something unique to me, which wasn't going to be easy, since I also wanted a Fender Jazz style bass. My budget dictated something dirt cheap, yet decent enough to mod properly...
That to my knowledge left 2 options. Squier by Fender, and SX basses. Being that Squier is a Fender product, and is pretty much just the bottom line of their product offerings, I opted to start there, with the low end of the totem pole model, the Affinity Series Jazz Bass, for several reasons. Budget would have allowed for a James Johnston Signature bass, but that instrument is based around an Agathis body, which tends to be too light, and neck dives, making the instrument harder for me to play, and it uses the Classic Vibe pickups which sound different from the Seymour Duncan provided "Duncan Designed" pickups from the Vintage Modified series. AND I wanted a unique color, specifically Burgundy Mist, a color Fender sourced from I believe it was either Buick or Oldsmobile in 1959. I have seen several Burgundy Mist Stratocasters in live performances, but never a bass... Although several can be seen online...
I know, it's sort of a pinkish, purplish color but it just looks so awesome in person, and honestly I have no problems with how I roll so to heck with people that are going to say it's a girly color... Hey if the girlies like it, then fine....
Now being that this is an Affinity series instrument it lacks the glossy neck finish which others like, but I prefer the silky satin finish of this neck, it features an Alder body, with just the right weight balance, and decent although not great pickups, they are serviceable...
I wanted to do some cosmetic modifications when I stumbled across a classified ad, and a problem... The problem, inherent in many Fender instruments, as well as many other brands, is that I was getting BAD, and I mean REALLY bad RF interference within the electronics, specifically the pickups and wiring, that I was getting a terrible buzzing only at certain times of day, when I played with my hands off of the strings and not touching metal such as when letting an open string ring out. I researched the problem and found a good number of Howto articles on shielding the cavities, and pickups that, well I had to do it.... At the same time, I found a set of the Duncan Designed Vintage Modified Jazz pickups in the classifieds for dirt cheap money... Well, like they say, combine need, with a desire to improve looks, and a project is born!
This bass, will be upgraded with...
#1. Full pickup cavity, and control cavity shielding. I haven't had the pick guard off yet, I know the bore for the wire between the bridge pickup and control cavity, and the bore for the bridge ground strap can't effectively be shielded, but pretty much everything else can. I will be using Corry's Slug And Snail repellent copper foil tape. I don't know for sure if the adhesive is conductive, reports conflict on that, I will test and post my results here on that...
#2. Swap pickups for the Duncan Designed pickups. They are in my possession and appear to have survived shipping okay... Will be shielding the pickups as well. The idea is NONE of the copper foil tape shielding should be visible...
#3. Swap out the pick guard. I selected a special pick guard that sadly has to ship from China, the measurements are spot on right, and if the photos are correct, the look is exactly what I am going for, very classy, and vintage looking.
#4. I despise standard Fender / Squier L metal bridge plates. They scream cheap, cheaper, cheapest. I sourced up a Squier Classic Vibe 60s 4 string High Mass cast bridge with brass saddles for dirt cheap money. Reports on these fitting properly conflict as well. They LOOK right, and SOME folks say they are a direct replacement bolt on piece, some say you need to fill and drill. I hae a small piece of 4/4 Alder a set of General Plug Cutters, and a bottle of Titebond III at the ready if I need to fill & drill... I mean lots of guys go with a string through type bridge so what's my little High Mass project compared to that?
#5. I will be color matching the headstock in the Burgundy Mist, adding an OEM type copy decal to keep the branding right, except I am going to have a minor change made, My current one says Squier by Fender J-Bass. I want the new one to say Squier by Fender Jazz Bass.The truncated print on the decal is a cost shaving measure, and a hokey as snot one... Once the paint and slide decal are "just so" I will be treating it to at least 3 coats of clear coat for the perfect finish!
#6. Lastly, I will be kicking the Fender OEM strings to the curb. Factory strings, particularly Factory Fender strings, are somewhat like factory table saw blades, good enough at first, but seriously lacking in performance or accuracy... I have a set of D'Addario XLNickel rounds in 45-100 that are spares for my Ibanezes, I plan on keeping the same strings on them all, so off with the Fenders, on with the D'Addarios...
All supplies for this project are either in my inventory, or on order being shipped in except for the paint and decals, I am trying to find the best sources for them...
Today, the Duncan Designed pickups arrived in the mail, used pull outs bought on the cheap, I wasn't expecting foam blocked and anti static everything, but I also wasn't expecting this sort of packaging either....
I somewhat concerned unpacked them and inspected the contents, it appears at least at this time, that the packaging was sufficient...
With any luck and a break in the other projects, you will be seeing some more photo posts of progress there, and with the growth in my skills there, maybe, just maybe, you'l hear some funky new theme music!
02 March, 2015
2004 Ford F150 5.4L 3V P0012 came back!
Okay I am stummped, I WILL figure this out, but right now here's the situation...
I have recently replaced the VCT solenoid on bank1, while I was in there I noted a considerable amount of oil sludge in the upper valve cover area where the bore the VCT solenoid fits is... I have since changed oil and am running the recommended quantity of Marvel Mystery oil. Since this engine holds 7 qts of oil I replaced 1.5 quarts regular oil with the MMO. This is of grave concern since I change my oil WELL within the MFG recommended interval, and ONLY use MFG recomended oil grades and brand name filters, although one brand I have since discovered is a complete dud. I won't go into details for fear of legal issues, but let's just say I will only be using OEM filters from here out, the biggest name in filtration that most people recognize right off the bat is cutting too many corners and putting out crap that can ruin your engine! Play it safe with your expensive engine and stay OEM!
I was able clear the P0012 code, but it since come back, same bank, and today a distrubing addition of distinct hesitation, and "chugging". I let the truck sit for a couple of hours, and started it back up, the hesitation / chugging went away, although I still have the P0012 code...
Due to the presence of the sludge in the engine, and the fact that the symptoms come and go, I can clear the code, and get 100 - 400 miles before it throws the code / symptoms again, I suspect there is EITHER a defective VCT that plugs open or closed too easily, OR there is a good amount of foreign material in the system from the sludge....
I am using the MMO to help clean up the engine internals / get the sludge the heck out, but I know this stuff takes time to work, it's not like a harsh solvent based engine flush, it is much more gentle on the engine, and unfortunately the sludge. it takes it's own sweet time...
Due to the bad habits of the design of this engine, there ARE other possibilities, most notably faulty cam phasers and / or timing chain tensioners. That gets DEEP into the engine into a system I honestly have NEVER had to repair, and have limited familiarity with...
I am going to likely attempt to clear this issue doing a solvent flush / oil change most likely this upcoming weekend. Failing that, I will have to quadruple down to get the Saturn fixed and back on the road so that I can take the truck out of service, fix this issue, and a nagging noise in the front end...
So I am off to do some research into effective engine flushes, I used to use the Wynn system when I worked as a pro mechanic, but that was a LONG time ago, and that is not something that at least last time I checked, was available to a driveway mechanic... I will keep you posted!
A word Ton clean air in the shop... How to build a Thien type cyclone Separator.
As I cruise through my shop spring cleaning, I am noticing the amount of dust that I am catching in the dust bin, and the shop vac and dust collector filters.
This brings to mind several very important factors that I need to discuss with you, and although I am NOT an expert in this area at all, I do know enough to take the advice of the experts to keep myself, and my family safe....
For starters, woodworking, metalworking, well pretty much making anything with any sort of tool is generally going to break materials down into finer and finer pieces, and depending on the work and the tools involved, some of those fine pieces create fine dust....
And believe it or not that fine dust poses some grave risks to health and safety of yourself anyone in that air space, and even the shop and structures themselves....
For the sake of this blog post, I am NOT going to go into detail on the explosion and fire hazards posed by wood dust, for that we will have a discussion later on, it's not that it isn't a concern, just that it is beyond the intended scope of THIS particular post. Instead if you want immediate information on the subject, please refer to the official OSHA web page on the subject.
Instead I wanted to concentrate on the health risks, toxicity, and allergen properties of wood and other industrial dust. It's far more insidious than merely just a snoot full of dust that will clear up with a kleenex....
Those ultra fine particles get into your tissues, and some that are so small they aren't easily rejected by your body, build up to generate toxic results... Some of those results can be downright lethal.
Now Bill Pentz, whom you may or may not have heard, has written an extensive and exhaustive, and honestly, exhausting to read very detailed technical and medical treatise on the subject and published it openly on his web site... http://billpentz.com/woodworking/cyclone/. I recommend you go and read his material when you have some time and absorb it in pieces.
Now mind you, I would LOVE to implement every single one of his recommendations in one fell swoop, but for many, if not most of us, that just isn't an option. We've got wives, mortgages, maybe kids car payments etc... we can only afford to indulge in our hobby just so far...
The good thing is that Bill shows us some budget friendly upgrades that can be tackled without a ton of cash....
For starters, the basics of the fact that a vacuum / dust collector can only collect / filter as long as air is moving, and the sooner the filter plugs up the sooner the whole thing stops working....
In the case of my shop vac, a 12 gallon Rigid, I built a trash can separator, and added a HEPA rated filter. (Filter fits similar sized Emmerson made Craftsman models as well...).
Now Bill's site recommends and I agree to a point that we need to be using 6" duct, however due to economics availability and stupidity at the time, I went with 4", or more specifically 5" at the collector with a Y to dual 4" runs... This WILL be upgraded in the future to 6" in / out of the collector / separator into a single 6" main and dual 4" drops to adapt to my tools.... More on that later...
So far it's been mentioned twice, a separator. The most effective design so far seems to be the Thien separator, and I have built several, with enough experience of the subject to have written for Phil Thien's website discussion forum the definitive HOWTO....
The advantage of the Thien style separator is that they are incredibly effective, inexpensive and somewhat easy to build and did i mention they were effective?
So over the years I have seen folks asking about this over, and over again, and I have seen Phil's answer that includes router table, or band saw and special jigs. I wanted to share with you my approach to the construction of a Thien Cyclone Separator lid. I have learned a LOT in the process of building the several units I have,. I hope this write up helps. I should note that this write up is done with the idea that it will be used for a 4" ducted system. If you are not using 4" adjust your sizes accordingly. Like Phil mentioned, there are no "plans" per se, and my solution may not work for your situation, but this is what I am doing to build my separator / baffles. There are many different ways to implement a separator using Phil's baffle design. My method is probably the simplest method.
First things first, you need to obtain the materials to make your separator.
So here goes the shopping list.
- 3/4" Sanded Baltic Birch ply, or whatever material you chose. Pine is cheaper, MDF is even cheaper. Take your pick. If you go ply, get sanded, unless you want to sand your arms off. I do NOT recommend OSB as that stuff is super splinter prone and a pain to work with.
- 1/4" - 20 threaded rod. This is best purchased in 6' lengths. You will need to CAREFULLY cut this to shorter lengths making certain the threads are undamaged. Be comfortable with a file and possibly a thread chasing die.
- 1/4" - 20 stop nuts A.K.A. Nylon insert nuts, nylock nuts, lock nuts etc... You will need 6 of these.
- 1/4" fender washers. 12 of these
- 1/4" - 20 standard nuts. 12 of these.
- 4" S&D pipe nipple, OR 4" Dust Collection Hose Splice.
- 4" S&D street elbow OR 4" Dust Collection 90 degree elbow.
- Container. Your dust bin as it were. I am getting good results from galvanized steel trash cans.
- Hot melt glue for a glue gun (and the glue gun) or clear silicone adhesive sealant.
- sacrificial strip of lumber, or foam insulation or something to allow bit to cut through and not damage bit or floor. (or benchtop, or sawhorses, or... you get the idea I hope.)
- 4" Dust collection hose, and clamps.
Next, you will need to assemble the tools needed for the project.
- Router. Plunge or fixed base doesn't matter. Plunge is easier to start the cut with, a fixed base is a bit more dangerous to start the circle cut with.
- Straight cutting plunge router bit. I used MLCS item #7751 3/8" dia, 1" cutting length, 1/2" shank plunge cutting straight router bit.
- Rabbeting Router bit. I use MLCS #8366 9 piece rabbeting router bit, 1/2" shank. Set for a 3/8" deep rabbet cut.
- Circle Cutting jig. I use the Craftsman branded version of the Milescraft 1203. If you don't have a circle cutting jig / edge guide for your router and want to buy this one, I STRONGLY advise you to immediately upon opening the box throw out the all plastic threaded knobs and replace them with 1/4" - 20 star knobs. I got mine from Rockler no problem...
- Jig Saw with GOOD wood cutting blades. I have both a junk old Skil jig saw, and junk Black and Decker blades. They work, but are not ideal.
- A means to sand the INSIDE of a circle. I am using an oscillating spindle sander, you can also use a sanding drum on a drill press to do the same job...
- Work surface and clamps. I use junk sawhorses for mine and don't care if I cut into them.
- Clamps to keep the work piece from moving on the work surface. 2 6 inch bar clamps work fine.
- Hot glue gun if using hot glue.
- Drill and drill bits.
- Measuring and marking tools, specifically.
- Sewing measuring tape. The flexible fabric kind to measure and mark the outside radius.
- Straight edge with measuring scale. A carpenter's square SHOULD be enough, but might not be long enough.
- Pencil.
- LARGE drawing compass, or at the very least, a string.
Now that you have the stuff, we move on by measuring the top of the container, outside lip to outside lip. I am again assuming a trash can here.... An example.
-Measure the outside lip to outside lip of the container in at least 3 different spots. Add those numbers up, and then divide by the total number of measurements to get your average. So for example your measurements are 19.5", 20", and 20.5" for a total count of 60 divide that by 3 for an average of 20. Now divide that number in half to get your radius (the space between the center point and the outside edge. That equals 10. Now that we have a radius, we know we want to overhang the edge just a hair to keep things from slipping in one way or another. Add 1/4" to that number. Now we have a radius of 10.25" right?
- Measure and mark your sheet material. Say you are using a quarter sheet of MDF. Measure 21" up the long side, and using your square draw a line across, insuring it is square, measure the distances in a couple of locations to insure you have it right. You should have a sort of square, 24" wide x 21" high. Using your square line up the opposing corners of the square and draw a line corner to corner. This gives you the center of the square.
- Drive the center point nail for the circle jig, and using your square, measure 10.25" from the nail, and draw a line.
- Set the router up with the straight bit, and circle jig, Connect the jig to the center point, and adjust so that the INSIDE edge of the cutting carbide is touching the outside edge of the line you just drew. Lock the jig down.
- With the work piece on a sacrificial piece, clamp it down so it won't move. Be careful to keep the clamps out of the path of the router.
- If using a plunge router, set the plunge depth to 1/4", if using a fixed base, set the bit depth to 1/4".
- Make your circle cut plunging or lowering the spinning bit / fixed base as neccesary.
- Repeat the two steps above but adjusting depth for 9/16" depth, and finally 7/8", the final cut WILL protrude through the bottom. This is why we put it on a surface we can cut. This last cut you MAY need to move clamps around to keep the circle piece captive while you complete the cut.
- Remove circle cutting jig, straight bit, and center point pivot hardware.
- Repeat the above process but setting the radius of the circle jig to 9 - 7/8" for the baffle piece.
Now to cut the rabbet.
- Set router up with rabbeting bit, set to make 3/8" rabbet, set bit depth no deeper than 1/2". I personally like doing 3/8" so that the distances are the same.
- Clamp the circle to your work support. You WILL have to stop, restart the cut to move the clamps.
- Make your rabbeting cut. I cannot succesfully do this via plunging, I simply sneak up on the cut and go to full depth riding on the bearing.
- Test fit the lid. It SHOULD be a snug fit, if not, figure out what measurements were off and start over again.
Make the cutout for the baffle.
- Using the sewing measuring tape, measure the outside circumference of the circle, divide by 3, and mark the start and end points on the outside edge of the disk.
- Using your square draw a straight line from the marks you just made to the center point of the disk.
- Measure, and mark 1.25" from the outside edge up on each of the lines you just drew.
- using a compass, or string, pencil, and nail, draw an arc from the center point, around the long way to each of the 1.125" in marks you just made.
- Using your jig saw, and possibly the drill / bits for starter holes, cut out the large radius notch.
- Clean up with a sander if neccesary.
Cutting holes in the lid for the plumbing.
- Center the pipe nipple / hose coupler and use it to draw the outline of the center hole.
- use elbow and line it up to be as close as is comfortable to the edge close to the rabbet.
- Use drill bit and create starter holes.
- Use jig saw and cut out your holes from the lines you just drew being careful to stay inside the lines.
- Using a spindle sander, or similar arrangement, "sneak up" on the fit for the plumbing so that you can just slide the plumbing through.
- Sand the right side of the outlet of the elbow so that you can turn it in as close as possible to the side of the can.
- Line up the baffle with the lid, and insuring that the holes and supports will not interfere with the plumbing, drill the 3 1/4" holes through both pieces at the same time. (This insures alignment.)
- Insert elbow, align to get as close to the side as possible without touching, and hot glue in place, filling any gap between elbow and its mount hole with hot glue for a complete seal. Insure at least 1-1/2" protrudes for the hose to clamp to.
- Cut threaded rod to 3 7" segments, clean threads on the ends. Install 2 normal nuts on each end, and a washer, allowing enough space to pass through the work pieces. Pass through from the inside, from the outside install washer, and lock nut.
- When all 3 spacer rods are installed, adjust the nutsso that the distance is equal, and the elbow barely touches the baffle.
- On the inside, screw the 2 nuts per side together in a "jam nut" configuration. This keeps it from backing off.
- Insert nipple / hose coupler adjust to where the end is 2" from the baffle.
- Hot glue the nipple / hose coupler in place the same way you did the elbow.
- Connect inlet hose to elbow, clamp in place. If you are using S&D fittings, the fit will be snug, slip the clamp on, then work the hose onto the fitting and clamp it down. You are good to go. Same applies below.
- Connect outlet hose to outlet, clamp in place.
- Test.
16 February, 2015
Shop time in service of the blog and vlog...
I have been doing video shoots, and editing in an effort to bring you the absolute best in online HOWTO tutorials, and entertaining videos showing you not only HOWTO, but also giving you a peek into the workings of my at times organized, and at others utterly chaotic shop, and mind...


After a great deal of research, I found that the wiring on TRRS goes from tip, speaker to audio left, first ring to audio right, second ring to ground, and sleeve to mic.
More research, and I found that the wiring in a standard headset was green and red wires are speaker +, the copper color wire is for the mic, and the green /red stripe or blue wire is the ground / common.
It also appears that line level inputs for a headset and line level inputs from a lav are both still line level inputs...
So some churning in my skull took place...
I started with an old cast off headset that had an earbud torn off that came with my old HTC Inspire 4G I guess 4 years ago now... Cut everything but the TRRS plug and as much uninterrupted cable as i can salvage then..
Back to Amazon...
First off, I needed a project box, big enough to house a 1/4" jack, and some wire. I went overkill but then again, I have room for more advanced circuitry should the need arise down the road...
Of course I needed a 1/4" jack and of course Amazon had just the ticket.
Of course I needed a soldering iron and solder. I already have an older Weller, but if you need one and need to get started with solder right off the bat, Amazon has that too..
Once I got it all gathered, I drilled a hole to pass the cable through, stripped about 1.5 to 2" of insulation off the outside of the cable and separated the wires...
Using a BBQ lighter, I singed off the insulation from the ends of the blue and copper color wires, and rubbed off the burnt waste.
I then clipped off the red and green wires, leaving only the copper and blue...
With the soldering iron heated up, I tinned the connectors, and the wires. Don't know what tinning is? I will have a video on that shortly!
With the wires, and the jack prepped, I proceeded to solder the copper wire to the tip connector and the blue wire to the sleeve connector allowing for a good solid connection.
Once the electrical connection was made, I proceeded to test it out, and found it works exactly as planned...
Next I simply centered a 3/8" drill bit on the opposing side of the project box, and drilled it through, CAREFULLY to not snag the wire, or jack.
Once I determined how much slack in the cable I wanted inside the housing, I determined location for, and tied a small stress relief knot in the cable, I then mounted the jack, secured the cable down into the project box and sealed the pass through to cable connection with 3M clear silicone adhesive caulk, screwed the lid on the box, and then applied a label clearly identifying this for anyone not able to figure out what on earth this doo dad is for...
While it's not the most stunningly beautiful thing to look at, it allows me to record with good clarity and volume at a considerable distance from the camera, and at unusual angles.
You will soon be seeing some of the 1080i video with radically improved audio. Including some better video of the work on the Saturn...
You wouldn't believe how many times I have taken the same bolts on and off of the car in order to allow you to have a better view of what I am doing!
However, my current camcorder is old, not as in Super 8 kind of old, but as in SD but at least it records to a hard drive and can transfer over USB old... My current cell phone, a Samsung Galaxy S4, shoots far better photos, and video than my camcorder.
To say the least, I have not been super pleased with the quality of the productions coming out of my computer with this equipment, even as I learn more, and practice more on the videography side of the coin as it were, the results from my camcorder were looking, old...
So out shopping for a new camcorder I went, and I admit I am REALLY liking the GoPro Hero 4 Black Edition, but I just can't bring myself to separate from that kind of money right now, not this close to tax day...
I did mention my phone takes much better video than my camcorder didn't I?
Now while I know these guys music isn't everyone's taste, but I must admit I really like the video quality they pulled off with a Galaxy S4....
So yeah, with proper use of the video function on the phone, I CAN actually produce some good, high resolution videos...
But oh that audio...
Talking into a phone, 10 or so feet from me while laying under a truck spinning a wrench might be a bit hard to manage...
Well, okay let's address the issues one at a time...
#1. In order to get stable, clear footage, I need a way to adapt the phone in place of a camera or camcorder on a tripod...
That's easy enough... A quick browse to Amazon and I quickly had a workable tripod adapter. It's a little bit of a stretch to get the S4 in the Otterbox Defender in place, but it goes, and it is held solidly in place... It's the Arkon Smartphone Grip Tripod Adapter
Now that you have that camera mounted up to a tripod, are you going to rely on the built in mic to record your beautiful voice from 10 feet away? talk about a miserable failure of a speakerphone!
No, you need a lapel mic to accurately capture your voice. Of course you don't want to use just any lapel mic, otherwise known as a Lavalier microphone, but you want a wireless mic...
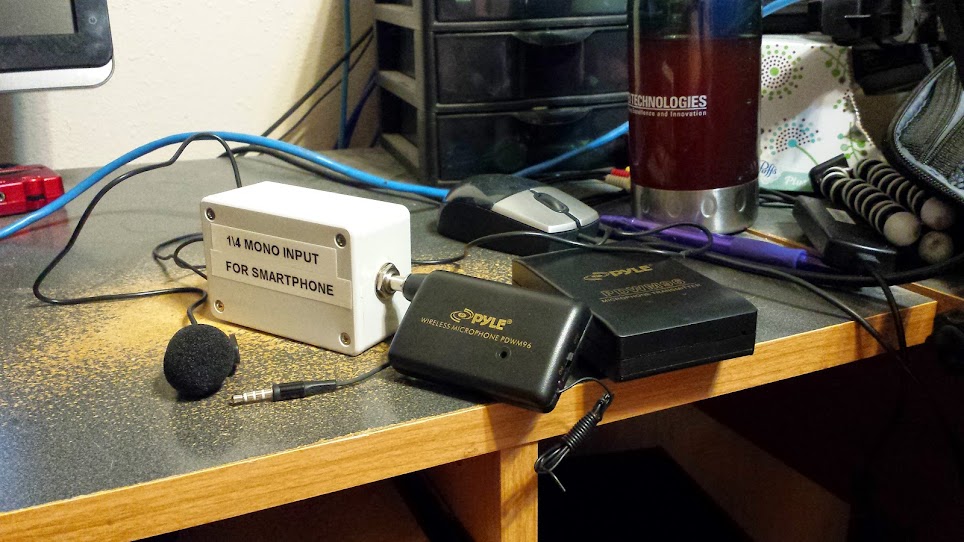
Being careful with the workshop budget, I opted for a low budget approach while I dipped my toes into the waters of wireless lavalier mic recording. And I must say I am far more impressed than I thought I would be with this mic system... The unit I opted for is the Pyle Pro PDWM96 Lavalier Wireless Microphone System which is a great bargain way to get my feet wet with wireless mics. I mean it's no Audio Technica, but it's also not $300.00 either!
There is just one eensy weensy little, or actually big problem...
The receiver for this mic has a 1/4" phone plug. Now this is all well and good when connecting to my mixer, but it's a bit of a conundrum when trying to connect to the 3.5mm TRRS jack in the phone...
After a great deal of research, I found that the wiring on TRRS goes from tip, speaker to audio left, first ring to audio right, second ring to ground, and sleeve to mic.
More research, and I found that the wiring in a standard headset was green and red wires are speaker +, the copper color wire is for the mic, and the green /red stripe or blue wire is the ground / common.
It also appears that line level inputs for a headset and line level inputs from a lav are both still line level inputs...
So some churning in my skull took place...
I started with an old cast off headset that had an earbud torn off that came with my old HTC Inspire 4G I guess 4 years ago now... Cut everything but the TRRS plug and as much uninterrupted cable as i can salvage then..
Back to Amazon...
First off, I needed a project box, big enough to house a 1/4" jack, and some wire. I went overkill but then again, I have room for more advanced circuitry should the need arise down the road...
Of course I needed a 1/4" jack and of course Amazon had just the ticket.
Of course I needed a soldering iron and solder. I already have an older Weller, but if you need one and need to get started with solder right off the bat, Amazon has that too..
Once I got it all gathered, I drilled a hole to pass the cable through, stripped about 1.5 to 2" of insulation off the outside of the cable and separated the wires...
Using a BBQ lighter, I singed off the insulation from the ends of the blue and copper color wires, and rubbed off the burnt waste.
I then clipped off the red and green wires, leaving only the copper and blue...
With the soldering iron heated up, I tinned the connectors, and the wires. Don't know what tinning is? I will have a video on that shortly!
With the wires, and the jack prepped, I proceeded to solder the copper wire to the tip connector and the blue wire to the sleeve connector allowing for a good solid connection.
Once the electrical connection was made, I proceeded to test it out, and found it works exactly as planned...
Next I simply centered a 3/8" drill bit on the opposing side of the project box, and drilled it through, CAREFULLY to not snag the wire, or jack.
Once I determined how much slack in the cable I wanted inside the housing, I determined location for, and tied a small stress relief knot in the cable, I then mounted the jack, secured the cable down into the project box and sealed the pass through to cable connection with 3M clear silicone adhesive caulk, screwed the lid on the box, and then applied a label clearly identifying this for anyone not able to figure out what on earth this doo dad is for...
While it's not the most stunningly beautiful thing to look at, it allows me to record with good clarity and volume at a considerable distance from the camera, and at unusual angles.
You will soon be seeing some of the 1080i video with radically improved audio. Including some better video of the work on the Saturn...
You wouldn't believe how many times I have taken the same bolts on and off of the car in order to allow you to have a better view of what I am doing!
07 February, 2015
It's a beautiful day for a video shoot! Moving along with the Saturn
Today has been a gorgeous day here, highs in the upper 60s, and sunny. The skies aren't so clear as to make glare everywhere, so today was a GREAT day to work on the Saturn a bit.
As I may or may not have mentioned previously, I was replacing more or less all the rotating assemblies on the front of the engine excluding the harmonic balancer, and the alternator which is somewhat recent...
Since I am not in an obscenely huge hurry, I felt this was a good opportunity to work on a video for you guys, and off to work I went so to speak...
I did jump the gun a hair, going with the assumption that folks know how to connect and disconnect a battery, I opted instead to remove the battery terminals, and serpentine belt ahead of time to maximize my video shoot time.
It would seem plans don't always go as you expect them to, and neither did this video shoot. I was shooting the segment about the bolts on the back side of the air conditioning compressor, and I had thought I had the camera running. I didn't. So in order to NOT skip that very important scene, I reassembled the bolts back on and effectively ran out of usable daylight.
This video I am spending a large amount of time, and effort honing, and am throwing together the first video, really taking a break from video editing to hammer out this blog entry.
This project will be in a series of videos. The videos in the series will be...
- Introduction to the project, and moving the AC compressor assembly aside, and replacing the compressor clutch.
- Water pump removal, replacement, upper and lower radiator hose replacement,,and cooling system flush and fill. I am seriously considering for the few bucks extra it will cost, and the reliability of a critical system, I am considering swapping out the thermostat at the same time.
- Idler pulley and tensioner assembly removal and replacement.
- Power steering pump and pulley replacement. Notes on the Harbor Freight pulley press tool. Power steering rack and pinion fluid bleed and flush.
- Battery top off and charge service (assuming it will take a charge).
- Lifting and supporting a teeny tiny car with jack and jack stands intended for a large 4x4 truck. Supporting your vehicle SAFELY while servicing it is critical, and there are times size matters more than other times...
- Rear wheel stud replacement, rear wheel cylinders replacement and brake bleeding.
- Engine flush, and full oil and filter change.
- Transmission Service (Saturn makes it soooooo easy...
- Saturn (Pretty typical GM) seat back recliner mechanism R&R.
Once we have finished with these repairs and services, we should be serviced up, and ready to roll. I simply need to get the car through at least 2 drive cycles and then take it in for an inspection and new registration stickers.
And I am bringing you along for the tour! I will be going over the tools and materials used, along with good options (I own a lot of old Snap On from when I worked full time as a young professional mechanic, age and wisdom has taught me that you don't need the high end fancy schmancy tools, and I will show you good lower cost alternatives and steer you as clear as I can from the duds...
03 February, 2015
Tearing into the Saturn...
So my 2001 Saturn SL2 is a bit long in the tooth these days, but I just hate car payments, so I need to fix what ails the old eccono box...
First and foremost, she looses coolant at the rate of about a pint a tankful. I find no evidence of oil in the coolant, nor coolant in the oil. No evidence of coolant fouled spark plugs, or steam emissions out the tailpipe.
I purchased a Harbor Freight "Pittsburgh Automotive" Item #61666 Radiator Pressure Tester Kit. Long time followers of my workshop blog, and my writings on various woodworking, and Automotive forums will know, I am not a Harbor Freight hater. If what they sell works as well as the next guys, lasts just as well, and costs less. You betcha I am going to use it...
Sadly this item was a FLOP....
I waited far too long after purchasing it to actually try it out. MY FAULT... But I was gravely disappointed when I did. I first tested it on my 2004 Ford F150 5.4L which I KNOW has no cooling system leaks. The tester simply refuses to build up pressure. It seems the female end of the tester coupler leaks like a sieve, and it just sill NOT build up pressure...
I would love to exchange it for a working unit as mine has never worked once. But like I said, I kept it too danged long before testing it and am out of the far too brief 90 day warranty period...
I need to figure out how to make this connection get a good seal and hold pressure, but I digress....
So with my own personally owned test set bad, I headed off to Autozone for the loan a tool for the pressure tester set.... Brought it home, and tested the system, looks like I have some weeping around the bearing on the water pump. That actually makes a wee bit of sense...
The water pump on this thing is on the passenger side of the engine, and from the direction of rotation of the belt, coolant / water etc... would likely get slung straight down, and if the leak only happens at temp / rpm then the heat of operation should dry it up before the car comes to a full parked stop....
Also, I have had an intermittent squeal out of the front of the engine...
Considering the cars mileage, the leakage, and the horrid squeal, and considering the fact that I have eliminated the alnterator as a potential source for the squeal if indeed there is only one, as it seems to be coming from the water pump / AC clutch area, AND the power steering pump. Just so I only have to get into this once and be done, I am going to replace the following...
#1. AC Compressor clutch. Already have a brand spanking new AC/Delco clutch ready to go in.
#2. Water Pump. Again brand spanking new GM parts...
#3. Power steering pump. Same as clutch and water pump.
#4. Power steering pump pulley, idler pulley, and tensioner. All aftermarket (Goodyear).
While I am in there, I am throwing a new Goodyear belt, and hoses with new clamps at it. Throwing new rear brake slave cylinders (The drivers side is weeping), new pads, Turned drums. Drums have less than 2K miles on them, I just want to scuff any crap the leaking cylinders might have put there off of them... I will also be replacing a wheel stud the imbeciles at Discount Tire broke off for me...
With that work done, I need to source up a drivers side seatback recliner as the factory piece broke. Or better yet, a pair of fresh sport seats that are more comfortable than the OEM GM back manglers...
With everything buttoned up, fresh coolant, and brake fluid flush, battery charged up, next is to service the oil with a fresh AC/Delco filter and Mobil 1 High Mileage 5w-30, and transaxle per MFG spec (Need to look that up!)
Lastly service the K&N filter, and then head on in for a state inspection and to refresh the registration of the car....
Once the Saturn is on "level ground" as it were, and its reliable old goat self, I will dive into the truck's issues, including finishing installing that trailer harness, / backup light set...
19 January, 2015
2004 Ford F150 5.4L DTC 0016 and 0012 fix.
So my truck threw a couple of codes and started running something awful, I could have used my general purpose code scanner dongle my wife got me for Christmas a couple of years ago, but instead I grabbed by SCT XCal 2 and pulled the codes. P0016 and P0012. Both for bank #1.
Did some quick Googling, and found those codes refere to the VCT solenoid. For those that don't know, VCT means Variable Cam Timing, and is a HUGE part of why modern engines produce so much more horsepower compared to older engines, for the same or better mileage and emissions...
The truck ran, rough, but it ran, so I went ahead and ordered the parts I needed, figuring I had all the correct tools. I was WRONG!
For my issue, the positive is that the error / code threw in relation to bank 1, the passengers side of the truck, which is easier to get to. The bad side, and something I was unaware of when I started this project, is that there is a T-25 Torx fastener in a what the heck were they thinking location...
To get the job done, I needed the following tools...
#1. Rubber / acid resistant glove.
#2. 8mm box end wrench.
#3. Screwdriver set with several flat blade screwdrivers.
#4. Long nose Vise Grip pliers.
#5. T25 Torx screwdriver with a shaft about .25" longer than the one I used. More on that later...
#6. Chunk of scrap 3/4" plywood approximately 2" wide and 10" long.
#7. Soft face mallet.
For supplies, you will need the solenoid itself, as well as a new VCT Solenoid Grommet. After my experience with the aftermarket solenoid, I also HIGHLY recommend ether a very certain and steady hand, OR some brake cleaner and a drop of good some kind of oil resistant stickum to absolutely insure the screw stays attached to the screwdriver until you have it fully seated and retract the screwdriver, OR, and this is a last resort, a good quality long reach mechanics retrieval magnet.
I used the Dorman 917-200 Variable Valve Timing Solenoid which is a direct replacement for the Ford OEM unit, incorporates some design fixes, but has the unfortunate design flaw of NOT being built to hold the retaining screw fully captive. This is only a problem during assembly and disassembly. I managed somewhat white knuckled, but I got it done...
The procedure sounds very simple for this side on paper...
Step..
#1. Protect ground battery terminal with acid resistant glove and loosen positive with 8mm box wrench, remove positive battery cable.
#2. Disconnect wiring harness lead from VCT solenoid by depressing on the release tab, it is oriented if you are staring at the valve cover from over the passengers side fender, at the approximmately 7:00 position.
#3. Remove the VCT Solenoid grommet by gripping it with pliers and pulling it free.
#4. Loosen the T25 screw from the VCT solenoid that is at about 2:00 position, and draw the solenoid free from the cylinder head.
#5. Remove the captive screw from the freshly removed VCT Solenoid.
Assembly is allegedly the reverse of disassembly.
That is NOT how it worked...
I got as far as starting to remove the VCT Solenoid grommet...
100K + miles and the Texas heat made the original piece somewhat less than cooperative coming out.... I figured the method out and it is thus...
#1. Soak the area around the grommet with a good penetrating oil like Aerokroil or better.
#2. Remove the valve cover oil filler cap.
#3. Pry up on the exposed lip / tab along the top of the grommet with a slim enough to fit under, but sturdy enough to pry with flat blade screwdriver once you have worked it up far enough, grasp it firmly with the Vise Grips.
#4. Working your way around from the flared piece pry up using that flat blade screwdriver, counter clockwise, occasionally tugging on the locked on vise grips...
#5. After a considerable amount of time, effort, and possibly colorful language, you hit a "sweet spot' where the grommet just sort of lets go and comes off...
Removal of the Torx screw was far less than simple as well... For starters, my existing Torx screwdriver set went up to T20, where my Torx sockets started at T30, leaving the all too uncommon, and critical T25 gap that we need for our project...
I was pressed for time, so online ordering the right tool wasn't ever really an option. So I went to Advance Auto and picked up a T25 socket, thinking this should do the trick...
No joy. The T25 socket, being 3/8 drive is simply too big to fit in the cylinder head service port for the VCT solenoid...
I ended up running back to Advance needing to buy a T25 screwdriver. They did not have just a single solitary T25 driver, no... it had to be part of a set....
So in desparation I bought the set, and went back to work, only to find out the T25 driver is just a shave too short to get into the T25 bolt fully seated with the shaft of the screwdriver dead straight, the handle hits the top of the VCT solenoid somewhat. With this being such a miserable failure, I am seriously wishing I had a longer shaft T25 screwdriver, had I known that the driver I had was insufficient I would have ordered one like the SK tools Torx Screwdriver T-25 5.91In. Suregrip which would have afforded me greater peace of mine in reassembly with that screw not fully captured...
Installation was indeed reverse of removal, with the added fun of making DANG sure the screw did NOT get loose from the new solenoid as I reinstalled it.
Now I have it reinstalled, code cleared, and a smooth running V8 engine again. Hopefully this means I can get some gas mileage back. The dumb thing was getting down to single digits. Low gas prices are nice and all, but I HATE wasting gas....
Did some quick Googling, and found those codes refere to the VCT solenoid. For those that don't know, VCT means Variable Cam Timing, and is a HUGE part of why modern engines produce so much more horsepower compared to older engines, for the same or better mileage and emissions...
The truck ran, rough, but it ran, so I went ahead and ordered the parts I needed, figuring I had all the correct tools. I was WRONG!
For my issue, the positive is that the error / code threw in relation to bank 1, the passengers side of the truck, which is easier to get to. The bad side, and something I was unaware of when I started this project, is that there is a T-25 Torx fastener in a what the heck were they thinking location...
To get the job done, I needed the following tools...
#1. Rubber / acid resistant glove.
#2. 8mm box end wrench.
#3. Screwdriver set with several flat blade screwdrivers.
#4. Long nose Vise Grip pliers.
#5. T25 Torx screwdriver with a shaft about .25" longer than the one I used. More on that later...
#6. Chunk of scrap 3/4" plywood approximately 2" wide and 10" long.
#7. Soft face mallet.
For supplies, you will need the solenoid itself, as well as a new VCT Solenoid Grommet. After my experience with the aftermarket solenoid, I also HIGHLY recommend ether a very certain and steady hand, OR some brake cleaner and a drop of good some kind of oil resistant stickum to absolutely insure the screw stays attached to the screwdriver until you have it fully seated and retract the screwdriver, OR, and this is a last resort, a good quality long reach mechanics retrieval magnet.
I used the Dorman 917-200 Variable Valve Timing Solenoid
The procedure sounds very simple for this side on paper...
Step..
#1. Protect ground battery terminal with acid resistant glove and loosen positive with 8mm box wrench, remove positive battery cable.
#2. Disconnect wiring harness lead from VCT solenoid by depressing on the release tab, it is oriented if you are staring at the valve cover from over the passengers side fender, at the approximmately 7:00 position.
#3. Remove the VCT Solenoid grommet by gripping it with pliers and pulling it free.
#4. Loosen the T25 screw from the VCT solenoid that is at about 2:00 position, and draw the solenoid free from the cylinder head.
#5. Remove the captive screw from the freshly removed VCT Solenoid.
Assembly is allegedly the reverse of disassembly.
That is NOT how it worked...
I got as far as starting to remove the VCT Solenoid grommet...
100K + miles and the Texas heat made the original piece somewhat less than cooperative coming out.... I figured the method out and it is thus...
#1. Soak the area around the grommet with a good penetrating oil like Aerokroil or better.
#2. Remove the valve cover oil filler cap.
#3. Pry up on the exposed lip / tab along the top of the grommet with a slim enough to fit under, but sturdy enough to pry with flat blade screwdriver once you have worked it up far enough, grasp it firmly with the Vise Grips.
#4. Working your way around from the flared piece pry up using that flat blade screwdriver, counter clockwise, occasionally tugging on the locked on vise grips...
#5. After a considerable amount of time, effort, and possibly colorful language, you hit a "sweet spot' where the grommet just sort of lets go and comes off...
Removal of the Torx screw was far less than simple as well... For starters, my existing Torx screwdriver set went up to T20, where my Torx sockets started at T30, leaving the all too uncommon, and critical T25 gap that we need for our project...
I was pressed for time, so online ordering the right tool wasn't ever really an option. So I went to Advance Auto and picked up a T25 socket, thinking this should do the trick...
No joy. The T25 socket, being 3/8 drive is simply too big to fit in the cylinder head service port for the VCT solenoid...
I ended up running back to Advance needing to buy a T25 screwdriver. They did not have just a single solitary T25 driver, no... it had to be part of a set....
So in desparation I bought the set, and went back to work, only to find out the T25 driver is just a shave too short to get into the T25 bolt fully seated with the shaft of the screwdriver dead straight, the handle hits the top of the VCT solenoid somewhat. With this being such a miserable failure, I am seriously wishing I had a longer shaft T25 screwdriver, had I known that the driver I had was insufficient I would have ordered one like the SK tools Torx Screwdriver T-25 5.91In. Suregrip
Installation was indeed reverse of removal, with the added fun of making DANG sure the screw did NOT get loose from the new solenoid as I reinstalled it.
Now I have it reinstalled, code cleared, and a smooth running V8 engine again. Hopefully this means I can get some gas mileage back. The dumb thing was getting down to single digits. Low gas prices are nice and all, but I HATE wasting gas....
14 January, 2015
Giving up your excess could be the answer to somebodies prayers...
Now I've known, and seen folks that pretty much hold on to any, and every last little trinket that they get their hands on... And while I have my shop, and home, well stocked, we often go through and determine what is just sucking up space and cluttering up our lives.
Sometimes, we sell, but sometimes, it is just easier and more beneficial to find a non profit organization that can make use of my excess to further their cause...
In my recent case of the clean out / donation cycle, I have come across surplus musical equipment, and tools. Specifically my old B&D Firestorm non slide 10" miter saw needed to go. I had the Chicago Electric 12" slider set up well, and was happy with it, and the old B&D was sucking up space in my shop. I've got a friend and neighbor that is a dad with very young kids, that while he's not broke by any means, needs to be careful with his family funds, and needed to replace a broken older Delta miter saw... So out the door of my place over to his the B&D went. It will live on now to help him finish the crown molding project he started on that managed to kill his 20+ year old Delta...
The musical gear I had in excess was a nearly new 100 watt 1x15 bass amp. I had it listed on bass players forums for sale, on Craigslist, and several other locations... No bites. Price was listed reasonably, but no interest. Admittedly I did wait until I got my own new amp to sell this one, so the purchase for Christmas stuff was over... But it was a good amp, and it needed a home that could use it...
A few phone calls and I got in touch with the worship leader at my church, who was more than happy to take the donation in. When I dropped it off, he mentioned that the amp in the high school area was on its last legs and this was a real answer to prayer as they needed a new one...
So now I have less junk cluttering up my life, and even though I didn't get any cash value back from any of this, I DID get satisfaction knowing that my donations are making a difference in the lives of folks around me... And that can be worth far more than money...
I will admit, the bass amp at least going to a non profit organization, can be written off my 2015 income taxes, so I guess there is a financial benefit to me, not much of one, but I will take it. Takes over the last several years have been kind of painful. Any relief is a blessing...
If you've got stuff cluttering up your life, and assuming you don't need to sell it to raise money, you might want to seriously consider donation to a worthy cause. You just might make a difference in peoples lives!
05 January, 2015
Holidays are done, time to get back into the shop!
First off, Happy New Year, and welcome to 2015!
I must apologize for being away so long, I have had a complicated couple of months, but basically my lovely bride has been working me to death over the holiday season decorating this that at the other thing, testing and fixing light strings, putting up the tree, blah blah blah... You get the idea... And on top of that, I have been dealing with some health setbacks. It would appear that the flu shot that went out this year was worthless for me, and I managed to aggravate existing back issues. So I have spent time healing, and honestly, I kind of let things slip my mind...
Now that the new year is here, and I am feeling MUCH better, it is time for me to get back into the shop and get some things done...
An overdue gift to my wife is refinished kitchen cabinets. I am hand sanding down the original doors, and door frames, easier said that done... The profile detail of the originals is a real son of a gun to sand without killing the profile...
I started out the process by using Citrustrip. and maybe I misread the instructions, but it DID say to rinse the stripper off, BAD idea. I ended up with warped wood, and delaminated plywood panels. Good thing the new owner of the home 2 houses down was replacing the cabinets with new units. He was kind enough to give me a couple of the doors from his cabinets that matched mine to replace the doors too far gone to fix...
So in lieu of stripper, I am now manually sanding, a time intensive operation. But it IS going well...
I have all but two of the doors from the overhead section completed, one just needs a fine sanding, the other the detail areas need to be sanded and then the whole thing needs to be fine sanded, then it's cleaning / dust removal, and stain / poly coats for these doors!
Once the doors are done, I move into the kitchen and sand those face frames, those should go fast, and then stain, poly, and finally, attach the new soft close hardware and doors, then move to the lower cabinets...
I think I FINALLY found my leak. It appears the faucet sprayer from the kitchen sink has been leaking, which saturated the particle board base of the cabinet. I will have to cut out that piece, make and install some cleats for a new panel to sit on, and then cut / fit the new panel in 2 pieces and attach. Will pre-paint it and make certain that it is sealed... Will be using 1/2" ply for the panel, and 3/4x3/4 stock for the cleats. Going to go all Norm Abram on these and attach it with glue and brads...
Time away from the shop has been well spent though. I have picked my bass guitar back up and been playing / practicing, and realizing I set that down too long, so I am going over the educational material I used before, I had to order one of the videos in a new copy on DVD as I no longer have a VHS VCR to play back the old tapes... But I am coming back pretty fast. Doing a lot of slow ballads, and quarter note stuff. It's coming along nicely.
For my back sake, I did ask for a new amp instead of tools this year, and I replaced my old Crate BX100 amp (67 lbs) with a new Fender Rumble V3 500 combo amp (36.5 lbs). My back is MUCH happier with me now!
Subscribe to:
Posts (Atom)