28 April, 2014

I found a winner of a design for my drill press storage / mobile cart!

It would seem that I am not the only person out there less than thrilled with the wasted space under the table on a floor model drill press, and wanted to reclaim it for use for storage, particularly of drilling related accessories and supplies.

Lumberjocks member Ken90712 appears to have found, and built from plans in Woodsmith magazine exactly the idea that has been mulling around in my head for quite some time now. A greatly improved mobile base and mobile storage cart to go over the mobile base while staying under the table... This will provide storage for all things drilling, spade bits, forstner bits, handheld drills, bit sets, jigs etc... Everything I own drilling wise, or am likely to own can go in here!

The build is actually pretty simple looking. Mostly plywood, some hardboard and some hardwood, but not much of either of those...


You can see he veered off the Woodsmith plan a bit here by using a pre fabbed mobile base kit. From the looks of it, the Harbor Freight mobile base kit, same one I own...


The side storage can be rearranged fairly easily, and I think I might just do that. Looks like a good place to stash the pocket screw and doweling jigs. Maybe the other side can hold the cordless stuff.


His lumberjocks project page has a decent write up, and was the source for the photos. His page can be found at http://lumberjocks.com/projects/100541.

Now mind you, unless I take to some serious metal polishing on the column, which I can guarantee just won't ever happen with my drill press, it's a user, not a pretty thing to look at, mine simply won't ever look that nice. Sorry...

Now that I have found a plan to follow, that has been built, and tested, I can move forward without worrying about if my plans will fit together the way I think they will!

27 April, 2014

Some auto related upgrades, and improvement to the safety center.

As I have mentioned previously, I own 2 vehicles, a 2001 Saturn SL2, and a 2004 Ford F150 4x4. The F150 weighs in at a beefy 7200lbs stock, that doesn't count the additional weight for the 35s, winch mount, winch etc... I figure I have at least 7500lbs on that thing.

 Unfortunately my old floor jack was just a puny little Goodwrench "trolley" jack i bought at Walmart probably a decade ago. It has been sufficient, sort of. Lifting the truck has always been a scary strain, and the lift height has been barely adequate and I mean barely. I also had a welded steel, decent quality, but still light gauge set of jack stands that really weren't up to the task of keeping the truck supported.

 Well Harbor Freight sales being what they are I headed in... I upgraded to the Pittburgh Automotive 4 ton service jack. And if my initial impression of the quality of this stands the test of time, this is one of Harbor Freight's few items that exceed the big name brands in every way I can imagine.

 The jack is a dual piston design, featuring a rubber bump strip to protect the sides of vehicles should the handle get away from the operator, and easily pumps from full retracted to full extended in 7 pumps. Not to mention this is the highest lifting standard service jack I could find. By standard I mean intended for auto and light truck, not the monstrocities intended for medium / heavy trucks. I don't need 20K lb handling in a floor jack, but nice try!

While I had thought previously about keeping my auto stuff all together in / around the rolling tool chest, with the size of this thing, it just wasn't workable. Thankfully I had just the right space between the lathe and tool stacker!


So now that I had a safe way to LIFT the truck, I now needed a way to keep it in the air. You do know working under a vehicle supported solely by jacks is a good way to make your wife a widow don't you? Well Harbor Freight again. They had the 6 ton jack stands, real quality pieces at that, on sale for $39.99, great reach to them, and perfect load rating for my truck. I wish I could have bought a second pair, and may still at some point in the future... For now they get stowed next to the big compressor by the rollaway tool chest.


Now mind you, the truck is still up at the BILs shop in Houston, but I did get LOTS done this weekend. The pump gasket, o ring, bushing, seal, torque converter, and even a new vent line have been put in place. My BIL was going to swap the fuel filter for me as I had a HUGE problem figuring out how to release those Ford quick disconnects. I got the rear, just not the front... All that is left is swap the fuel filter, double check the nuts, bolts and connections, reconnect the battery, fill, start, run through gears on the lift, check, adjust, double check for leaks, and drive home... Will be VERY happy to have my truck back. It is old too, but my Saturn is getting Geriatric these days... 

With the automotive lifting duties SAFELY squared away, and while I was still in Harbor Freight with a fist full of coupons, I wandered over to the aisle that I have been avoiding since the late 90s. Yes boys and girls, I bought a cheap cordless drill / flashlight combo.

I don't expect much from it, and because of this, it has by far exceeded by expectations. The price after coupons was $18.99, and the poor girl at the register seemed a bit confused when I refused the extended warranty as I explained I considered this a disposable experiment.

I have long hated cordless tools due to their unpredictable power source, low power output, and in general poor performance. In the few short days I have owned / used this tool, it has so far exceeded the performance anyway, of the old Skil, B&D, and even Makita cordless tools from back in the late 90s. I used it to cobble together my next item on the list of what I wanted to talk about today, and honestly, I must say I was pleasantly shocked by the torque / power output of this thing. It's by no means fast, but it will certainly punch holes and cut countersinks just fine! 

Overall the fit and finish is far better than I expected, but I must admit some concern for the durability of the directional selector switch. It feels rough and plasticy in operation. But it did work fine for now. So no complaints yet. For the dirt cheap money at least so far it has been a fair investment. However cheaply made switches, and ancient battery chemistry and this I can honestly see as a throw away tool... Too bad too. It has the capability to be a good tool if they would just put that extra little bit into it. Maybe charge more sure, but go with Lithium Ion batteries and put a decent switch in it!


Well once I got the new stuff situated, I started in on the safety center. Tonight I moved the simple bracket I made to hold the safety glasses (To make room for the respirators), and created a dispenser for my Nitrile gloves. The dispenser if pretty basic just screwed together using drywall screws and made from 3/4" and 1/2" plywood scrap. The carriage for the respirators will be made similarly. The idea is to make a safe way of keeping them somewhere handy, and that somewhere is the back of the man door. It works exceedingly well, and I could only wish everything else went together as easily as this...

The nitrile glove dispenser is simply a holder designed to hold a box of the Harbor Freight nitrile gloves A new box just slides in to the open top and is retained by the plywood straps on the front and the bottom. The opening in the box has been provided with full access. I can only hope and pray that Harbor Freight never changes the size / opening of the nitrile gloves box... 


I am not certain at this point, but I may just take a hair of extra time and simply knock the edges off of the exposed surfaces with a palm sander just to make it safer to work around... 

You may have noticed that I have 2 sets of safety glasses, but only one hearing protector. That is because my second set grew feet and walked off a few years ago... I need to find a new set. I am using Winchester shooters muffs. They work great. I just need to find a second set...

Lastly, it's not pictured because, well it's not completed yet, but I have the cutlines for the carriage / box for the respirators done. I will simply build a holder that will hold the sealed plastic mini tote that I use to hold these in. I like the tote because it seals shop dust out of my respirator, so it doesn't in itself become contaminated while I am not there, and not using it.

25 April, 2014

A quick tidbit about my equipment.

I wanted to give you a quick heads up, as part of my blog, about certain pieces of my equipment. Tonight's highlight is my Neiko 6" Stainless Steel Digital Caliper. 

I have owned this caliper now for several years, and aside from going through batteries (they all do), this has performed flawlessly. I have compared this to a friend's Starrett and mine is dead on to the Starrett. I simply put, couldn't be happier with it. 

The caliper was an excellent bargain, comparable in price to the Harbor Freight 6" stainless Steel Digital Caliper, but compared to the HF caliper, this thing is dead on like I said to the much higher priced Starrett. It came complete with a pretty decent case, a spare button cell battery, and a reasonably well written instruction sheet.

Use is pretty simple, bring the jaws together, turn it on and push the units (SAE or Metric), and then zero it. Once zeroed use the thumb wheel to roll it in / out and well, measure what you need to measure.

If you require prescision measurement in your shop, this is the tool to do that job!

22 April, 2014

Harbor Freight Dovetail Machine info...

As I get ready to start using my Central Machinery Dovetail Machine, I have come across some very useful, and interesting information that might just have me radically changing up my dovetail jig... jig.

For starters like much of Harbor Freight's tools, the dovetail machine is just a belly button Chinese mass produced tool with Harbor Freight's paint colors and branding on it. The same exact jig with different colors and stickers is literally marketed under a huge variety of names.

What I found most particularly notable is that a reseller of one such relabeled version, Busy Bee Tools, and the relabelled version is the Craftex CT052 has put together a great instructional video on how to set this thing up and use it. It would appear a good number of owners have no clue how to actually use this thing...


Likewise, there are a wide variety of storage boxes, and accessories folks are building for these. There is an interesting one that Lumberjocks member "TheDane" made for his Central Machinery Dovetail Machine to top it off, that post sparked a great discussion on simple modifications that owners are doing to make their jigs work better for them. 
One item worth noting is that contrary to Harbor Freight's advertising, the dovetail machine is compatible with a wide variety of dovetail and box joint templates.
http://www.grizzly.com/search/search?q=H0983
As I mentioned above, TheDane's dovetail jig storage box intrigues me for various reasons, not the least of which is just the look of the thing. But aside from that, there is function... I honestly don't quite understand what some of the stop blocks are for. I haven't put mine through heavy use yet, but I don't see a real need for stop blocks against the jig to keep it from moving. Perhaps I am missing something...
http://lumberjocks.com/projects/42759
The storage / use box pictured above offers some
interesting features.
Most notably the drawer for stowing the optional
template guide combs, collars, and dovetail bits.
As you know, in a small shop, maximizing storage capability is king, and this is a kingly idea for sure! 

I have found other reviews online for this, and other clones of the same unit, most notably the Woodstock International W1099 sold by Grizzly. There is a great write up of it http://www.thewoodshop.20m.com/w1099.htm that goes into detail on usage and explains a bit more in a written fashion the same things that the video I linked above from Busy Bee / Craftex does.


So my construction method for my miter saw cabinet drawers might have been decided here. I need practice cutting and fitting dovetails, building drawers so I can get proficient at it to tackle the drawers for the new cabinets in the house. I would like to build them all with dovetails, mitered frame / raised panel drawer fronts, and soft close slides...
Shop furnishing projects build the skills to build home furnishings and fixtures. And boy do I need practice!

21 April, 2014

Project planning or how to eat an elephant...

Right now, as other projects are ongoing, I am squeezing in design time, and planning to complete what is left of my shop storage / organization tear as it were.

As I fine tune the designs I am going to be squeezing in some of these builds as soon as possible.

#1. Finish building and installing the drawers for the miter saw / mortiser stand / cabinet.

My problem now is that I want to change the design of the drawers and I built it in such a way to make this difficult.

I did this to myself but I can figure it out too!

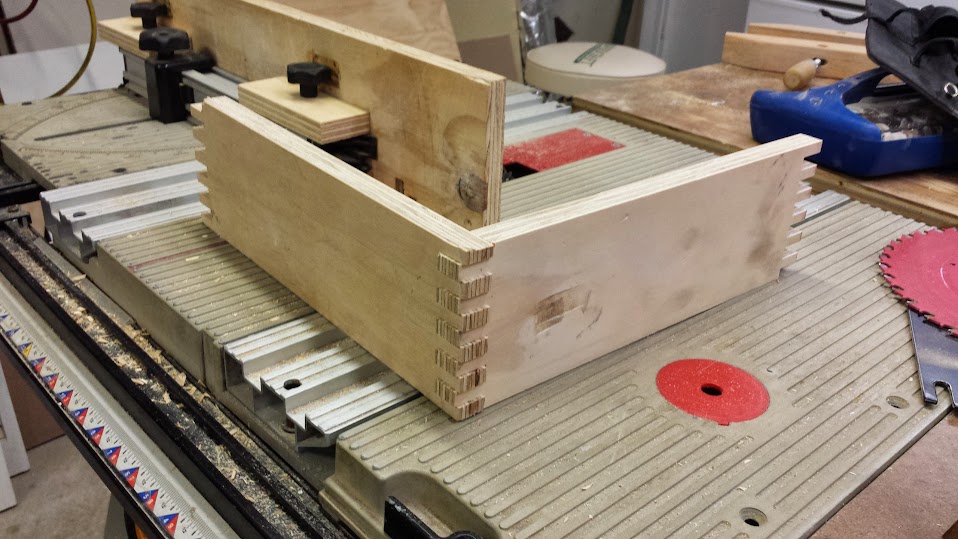
I designed it with space for 6 drawers in 2 columns of 3, I want to eliminate the middle drawer, and make the bottom drawer double deep. I guess just leave the middle drawer out and go for it, anyway, the now to be double deep drawers will be used to hold on one side, the biscuit joiner, and my cylinders of biscuits, and most likely my buffer, bonnets, and various buffing / rubbing compounds. The other bottom drawer I was thinking about using for my framing nailer, and one or two other large, caseless tools, or maybe just the nailer and the boxes of framing nails... The upper drawers will hold spare blades for the miter saw, clamps, chisel hones etc.. for the mortiser, I also have some granite my brother in law gave me I need to cut up, and I just had a stroke of inspiration on that (half moon masonry tool for the HF multitool!) anyway, the granite will be cut up into sharpening station pieces, for 4 different grits starting at 120 and going up... So store those and the sharpening jigs there.

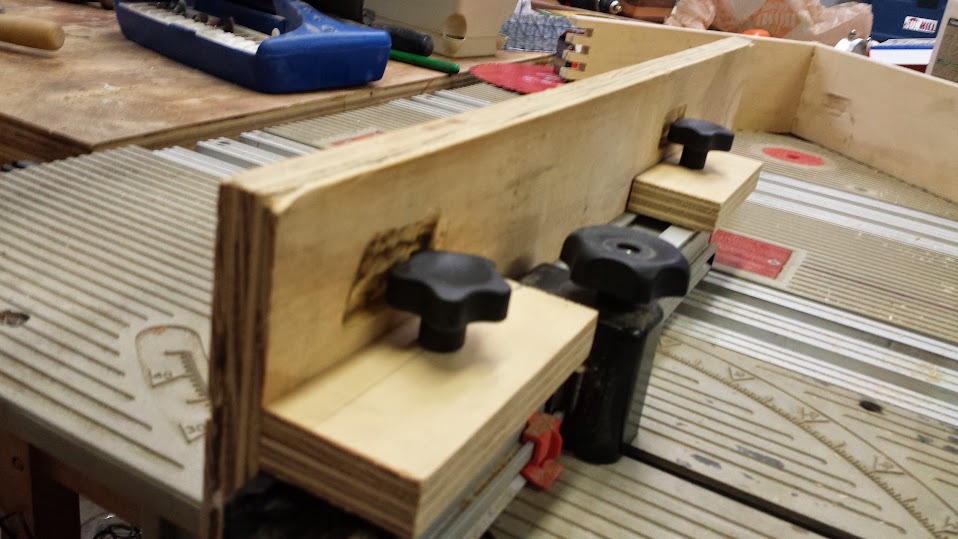
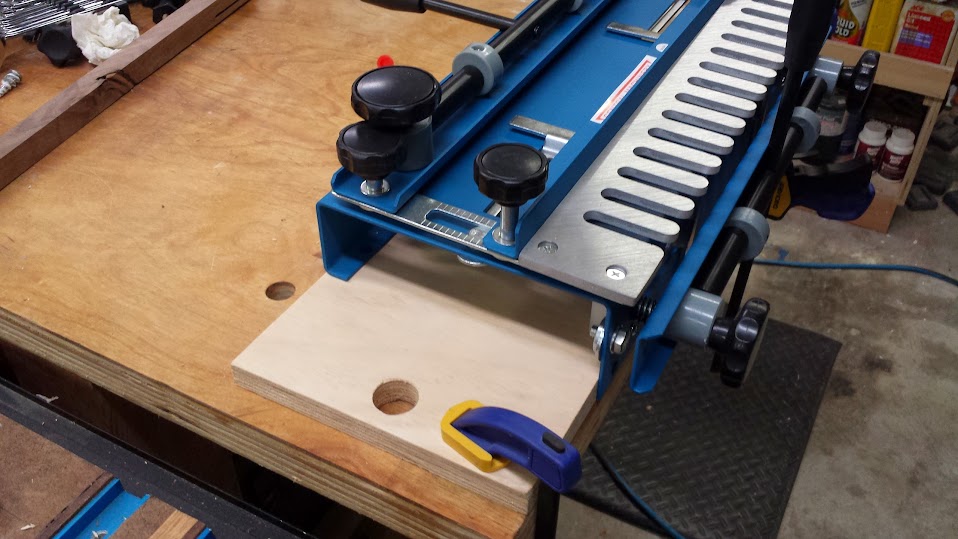
I still haven't figured out how to get good results with the MLCS dovetail jigs, so I am shifting gears, since these are shop drawers, I figure I will make my joinery using the Harbor Freight dovetail jig. My drawer design is going to be different though. I am using the bottom panel as the slide as well, they extend into a dado-ish void in the sides, and ride, lubed with bees wax. I mismeasured some and had to make thickness adjustments to the bottom panel with a belt sander, but that is a story for a different post... The box sides will be dovetailed. and joinery sides to bottom panel will be via through dowel joinery, probably using 3/8" dowels... I honestly wanted to do some unique joinery / drawer construction mostly for fun... I ended up making this hard on myself...

#2. Install blow in insulation in unpowered wall (remaining wall without insulation). Finalize drywall repair on walls, smooth it all out, paint the non powered wall and overhead door wall. The ceiling / attic ladder framing and drywall repair can wait a while longer. I want to keep the ladder where it is, but it MUST be framed in more securely! Again, the builders and the inspectors over the years have NOT done a good job when it comes to this. It NEVER should have passed inspection!

#3. Sheet goods / cutoffs cart. LOML is getting somewhat insistent. I worked with a guy that had built one on another forum and came up with a workable design that requires 2 sheets of plywood and 4 casters.

I had set up a 3D model with a cutlist of sorts, the orignial designer has updated his cutlist, and it appears to work better, however from what I see in the model, the cutlist he laid out is still a bit, well... inadequate. I have taken the model I built, and created a cutlist from it,


Image source: 

http://lumberjocks.com/assets/pictures/projects/274598-438x.jpg

original designers cutlist.

My updated Sketchup model can be found at..

https://3dwarehouse.sketchup.com/model.html?id=u7bcebf6e-5281-4555-a33c-167bbd247334

The original designers project build is hosted on a project post on lumberjocks.com and can be seen at http://lumberjocks.com/projects/60085

Once the sheet goods rack is finished, I am not certain of what the next project should be, in order to get the maximum usage out of my shop.

The projects that will remain are...

#1. Drill pres base cabinet. A removable cab that will ride on my mobile base to my drill press to hold my handheld drills, as well as bits, hole saws, jigs and misc drilling accessories.


https://3dwarehouse.sketchup.com/mod...af82bdc897cba1

I may have to delay my use / storage jig for the HF Pocket hole jig as I hadn't considered keeping it in the drill press base cabinet. I may possibly just hang it on a peg attached to the side of the cabinet...

I know they are cheap disposables, but I am planning on picking up a Chicago Electric 1/2" Hammer Drill, and a Ryobi One+ Lithium Ion cordless driver / drill... Those will need to be considered for the storage...

With the drill press cabinet out of the way, that frees up one third of the storage on the top of the library cabinet, and a bunch of space on the miter saw cabinet.

#2. Lathe base storage cabinet to house my turning tools, chucks etc... and to enclose at least 2, probably 3 80lb concrete bags in the very bottom for ballast. Design still in progress. Having some difficulty deciding on the drawer layout...

#3. Table saw / Router mobile workstation. I would like to design and build this such that ALL of my table saw / router accessories, fences, jigs, bits, blades etc... store neatly inside, with an effective mobile base, and leveling feet. I have ideas, but need dimensions.

#4. HF DC "Side Flip Stand modification, with Thien Top Hat separator". I suspect we've all seen them, and I want to build one. A stand to reorient my impeller housing to eliminate the connector hose between the impeller and the inlet ring that the bags go on, with the intake pointing straight down into a Thien separator, in this case I want to build a top hat style to go on top of my 31 gallon galvanized steel trash can. Once done, this will be moved off the stand, and on to the floor, giving me room for...

The side flip stand would look something like this Lumberjocks.com member's project except the motor / impeller and ring would be mounted probably 6" higher up to allow for room for a Top Hat Thien separator... I may also change the impeller itself for a larger impeller. I have found a part # that allegedly interchanges, that should move much more air. It always bothered me by how small the stock HF impeller itself is...  Oh, and I might just to be different, actually paint my dust collector cart... And possibly the ring, impeller housing, and motor mount... Be good practice with the HVLP gun...


The Thien top hat separator is something like this lumberjocks member's build... I would build mine with a 5" in / out, and not cu the clear window in the side (I check my waste bin often). Also I wouldn't use the clear acrylic for the cylinder part... Just don't see the need...


If you are unfamiliar with what a Thien separator is, it is a particular cyclonic separator baffle invented by BT3Central member Phil Thien. He has his own website detailing it which features a reasonably active discussion forum centering around his separator and dust collection.
http://www.jpthien.com/cy.htm

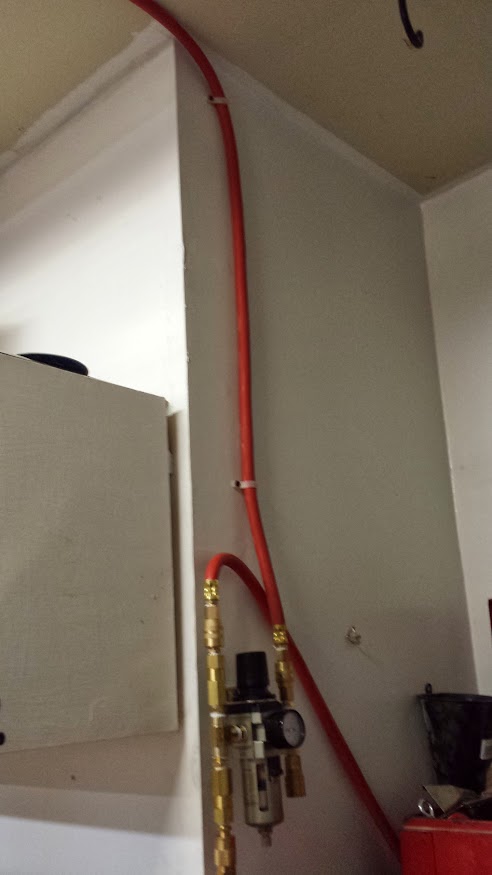
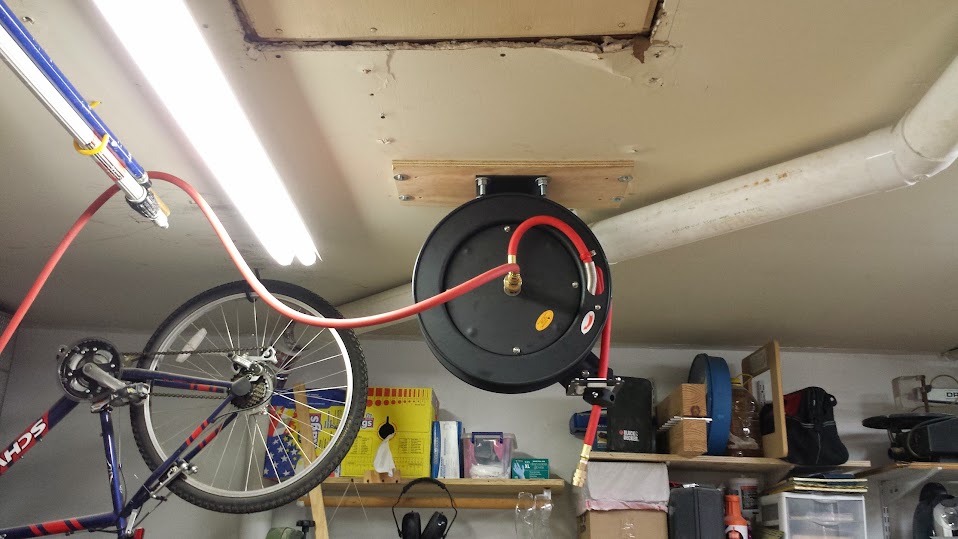
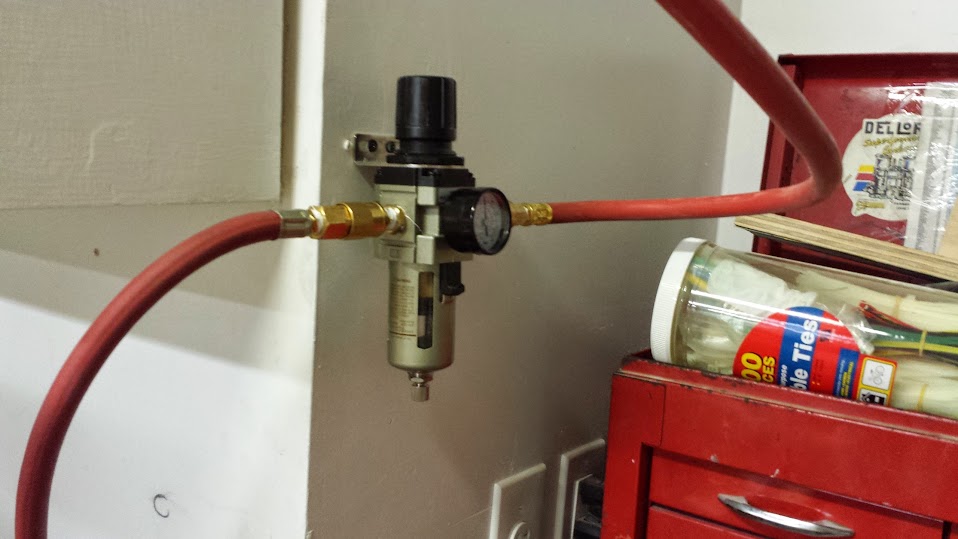
#5. Above the DC / tool box storage cabinet. This will need to be VERY solidly built, and securely anchored. Remember my shop supports not just woodworking, but also auto repair and home repair. It will hold.
--5A. 8 gallon air compressor. Put this as close as possible to the manifold etc... My 8 gallon compressor is the older version of THIS MODEL with the only difference I can see are the handle, mine is molded plastic where this one is tubular steel, The foot arrangement, mine has one foot, this has two, probably better for stability, and the stickers on the tank... Oh and my compressor is rated .1CFM higher at both 90 and 40 PSI...
--5B. Floor jack and jack stands. The tiny, under capacity for my truck units are going to be cleaned up and sold, replaced with a Pittsburgh 4 ton floor jack. I am willing to pay more for a better quality jack that has the capacity to meet my needs, but I haven't found one yet!
--5C. 6 ton jack stands. I have some old, orange steel jack stands, I think they are rated to 3 ton, but I am not willing to risk it. Probably sand them down, repaint them, and sell them.
--5D. Ball Joint Press and adapter cup set.
--5E. R134A Manifold Gauge set. Mostly because the friend I borrowed this from doesn't seem to want it back. I don't mind storing it, but Joel, if you see this, please don't think I am not trying to return this to you! Again I don't mind, I just would hate to have any misunderstanding with friends...
--5F. Pulley remover / installer set.
--5G. Radiator / cooling system pressure tester.

#6. Replace the simple shelves that are next to the tool stacker with a proper wall cabinet. I want the cabinet to house my spraying equipment, cleaning equipment, shop rags in a box, basically most of the stuff that is on those shelves, plus add more abrasive storage and keep it neat. I don't have a design yet, but trust me, one is coming soon... I will need to insure that I have jig storage factored in there as well for the dovetail jigs, as well as for my box joint jigs.

#7. Design, build, and install some sort of means to store the remaining safety equipment, respirators, cartridges, nitrile gloves, hearing protectors, safety glasses etc.. on the man door where the fire extinguisher and first aid kit live now.
#8. Not sure if I can get my lovely bride to agree to this, but I am considering painting the shop side of the man door bright red to indicate that is the emergency / safety center.

#8. Build a quick & simple rip fence micro adjuster for the table saw. I have plenty of the necessary hardware, and the design is forehead slapping simple, I just need to do it...

So as you see, I have a TON of work left to do to finish just the shop storage projects. I have plenty of projects to do for in, on, and around the house, cars, and my own happy self.. So we will see what gets done and when!

16 April, 2014

More truck time. Progress thus far.

The problem with getting anything done on my truck is my brother in law's shop is in Houston, about a 45 minute drive away from me, so getting up there when I have time has been difficult at best.

This past weekend, I was able to get up there, and spend a few hours before the sun went away on us, and got a bit done on it...

So far I have the following removed.

#1. Front and rear drive shafts.
#2. Starter.
#3. All electrical connections to both the transmission, and the transfer case.
#4. Both tranny, and T case linkages.
#5. Trans cooler lines.
#6. Crossmember (trans / t case now supported by tranny jack).
#7. Access plate
#8. All torque converter retaining nuts.
#9. All bolts excluding the upper right hand retaining transmission to engine.
#10. Exhaust retaining nuts and bolts. The joints were soaking in penetrating oil when I left it...

One of the converter nuts rounded off, and we had to chisel the thing off the stud. We were VERY careful and managed to not damage the flex plate.

I need to get in and get a set of nuts for the converter, and some fresh nuts for the catalytic converters as they came off pretty rusty.

Honestly, if I had the $$ to do it at this time, I would pull the cats, and the cat back remainder of the exhaust and go with Magnaflow stainless replacements. But yesterday was Tax day, need I say more?

My next trip to the shop, I need to put the crossmember back on, spin the converter to expose the drain bolt, drop the pan and drain the converter, then drain the T case.

With the pan out, I will clean it up, locate mark and drill for the drain plug hole, then hand it over to have the plug kit welded in. (Post install photos WILL be coming).

Once the pan is back on, we finish dropping the trans / t-case, and move on to pulling the converter, and seeing if we can see where the leak is coming from. Most likely just replace all the seals in the front while we are there, main oil seal, bushing, pump seal and o-ring. Then prime the converter, and reverse the process...

Once the tranny problem is sorted out, and before I leave the shop, I am going to get them to finish trimming the back side of my front fenders to keep those big meats out during compression on turns. With the Autospring 2.5" level / stock shocks / springs I never had a rubbing problem, even at the hardest turning / compression, but with the Rancho QuickLift Loaded, I have had nothing but problems. Don't get me wrong, I LOVE the shocks themselves, the shock damping is fantastic, but the springs they use are horrid. I know the extra weight of the winch and winch mount add to the problem, I have repeatedly asked, to dead silence, no answer what so ever, if I can swap in the Heavy Duty front coil springs from the Payload Package F150 to keep the nose out of the weeds... I understand their being leery of recommending it, but the problem WAS caused by a Rancho product, you'd think they would want to help a customer sort it out...

If I find out I CAN use them, I am going to swap out the Rancho coils and Coil Sumo Springs (Coil Spring boosters) and swap in the heavy duty Ford coils and call it good...

While I am in there, I am also swapping out the fuel filter, and performing an oil change.

And I often get asked why I am putting so much effort into keeping 35s on a truck that is only running a 2.5" level. My wife is only 5' tall, so no, I don't really want to go any higher.

Next on the truck maintenance agenda I do at home...
#1.The dreaded spark plug change on a Ford Triton 5.4L 3V.
#2. Coolant flush and fill.
#3. Flush and fill power steering fluid.
#4. Flush and fill brake fluid.
#5. drain, clean, and refill differentials.
#6. Sand, prime, paint, clear worn through paint spots on back of cab and front of bed from where the toolbox rubbed.
#7. Plasti-Dip black the rims. I know the Plasti-Dip thing tends toward the youth fad side, but I am sick and tired of dealing with brake dust, even with ceramic pads. And it would appear I am going toward an Arizona Beige and black scheme with this truck...

Still in my wishlist for mods on this truck...
#1. In bumper LED "Flood" reverse lights. The stockers make backing up in off road at night a scary experience...
#2. Leather and wood trim interior conversion.
#3. Traction Adding Differentials (ARB Air Lockers) and 4.56 gearing. Will have that done by a driveline shop. Not willing to take that project on!
#4. "Infotainment system" with bluetooth Android integration and mp3 / mpeg4 playback (video to passenger seats obviously...
#5. Straightening and reinforcement of my existing Delta gullwing toolbox and Tan spray on bedliner coating of box. Reinstallation of antenna mount and 102" CB whip.
#6. Finish design and build of CB mount. Remount CB and fine tune.
#7. Replace the rusted Hunter tube steps with new Go Rhino units... No rust, far less likely to rot out.

14 April, 2014

A simple box joint jig for the Ryobi BT3100 and related saws, and my first box joint success!

Tonight is a night for celebration. I got to spend some quality time getting my sanity back from too much work work, and got to spend some time getting skill building woodworking done... Or at least jig building.

So without further ado here it is, my very first successful box joint...


Yes that is very much scrap plywood. Specifically I had used it to get that touch more of lift out of my too small floor jack when I rebuilt the front end on my truck... Hence the floor jack wheel shaped dent in the wood... but I digress...

The joint is smack on where it needs to be, and although I left the pins proud (intentionally I might add!) the fit it tight, and clean, no slop, just an easy snug slip fit.

The main section of the jig is just your normal flat piece of wood with an index pin, and the hole cut by the dado stack as it is worked... This particular one is 3/8". 


The indexing pin, and spacing pin (extra pin to set the initial spacing to stagger the panels... Are both 3/8" x 3/8" walnut. I haven't quite figured out how to stow the extra index pin. For now I have it set on one of the mount flanges and taped down. That WILL have to change. Just no real clue what to do.


As you can see, the attachment to the miter fence is via star knobs, and of course T-nuts. Both of which were sourced via www.t-nuts.com If you decide to do business with that vendor, please use that link, or the link at www.bt3central.com under forum --> Partner Links --> T-nuts.com. This will benefit the Sawdustzone foundation and the work they do, and you get a discount code for 10% off. So why not save some green and help out a non profit organization? The products are top notch, and they carry the special sizes used by the Ryobi BT3000 / BT3100 / Craftsman 22811 / 21829 and related saws.

I had to carve recesses into the back of the main piece to allow the star knobs that hold it to the miter fence turn freely. This was done with a simple grinding wheel on my dremel.


So while it isn't a nice new glamourous and shiny machine, it IS a very effective piece of equipment that will help me increase my woodworking project quality.

I have 2 more of these to make, I originally wanted to make one in 1/4", but I am happy with the 3/8" for a small size, so I am going to go with a 1/2" next, and MAYBE but not with any certainty, I might build a 3/4" version...

Time will tell...

13 April, 2014

A dovetail jig... jig.

The name for this post comes from a lumberjocks project post where a fellow made a jig... jig. Basically a storage box and level platform for the Harbor Freight pocket screw jig. I still need to build one of those, but that isn't what this is about.... However the hanger hole idea IS a copy of the jig... jig layout.

Like many of you, I fell prey to, uh I mean I added a Harbor Freight Central Machinery 12" dovetail machine / jig to my woodworking arsenal. While I had through dovetail jigs, I wanted a half blind jig to work drawer boxes. And I could either go with the Harbor Freight jig, or I could spend several hundred dollars for a jig exactly the same as the HF, or slightly different, ever so slight...

It is designed to be mounted to a bench, but let's face it, how often does your average hobby woodworker cut dovetails with a cheap template rig? So instead of mounting to a bench, it really should be set up in such a manner that it can be moved and stored easily, but clamped in place when needed, and then perhaps taken off and hung on a peg or hook when not being used...

Well that's easy enough!


Construction is a simple hunk of 3/4" cabinet grade plywood, 22" long x 7.5" wide, the jig / machine is centered, and screwed on with just regular drywall screws the ones holding the top down are cut to 5/8" so they don't sit proud of the bottom of the plate, and a 1" augered hole centered across the top is drilled in...

I know not much of a project, but certainly functional..

Clamping is secure, and out of the way of the operation of the router / jig.

The well placed hanger hole needs a purpose to its life. It will get
one very, very soon!

You can see that although this rig is quite simple, it is also a very appropriate setup for being able to use, and store the jig....

I now need to figure out how / where to store this jig, as well as my large, and small MLCS Pins & Tails through dovetail jigs. I also have box joint jigs 1/4", 3/8" and 1/2" in progress, so effectively I need to arrange for storage for all of my joinery jigs... 

12 April, 2014

Some very good reasons for using Teflon pipe thread compound instead of tape. And the need for anti fatigue mats.

In the process of building my pnuematic plumbing system, I used teflon tape, which I have used extensively in the past with no failures, but somehow, this time around, somehow a persistent hissing noise, and fairly rapid pressure drop / frequent compressor cycling.

Well time to troubleshoot the problem...

Step #1. Mix up a batch of super duper hi tech leak detector solution. I.E. soapy water. I use Dawn Dishwashing soap, but take your pick. You want something to apply to where you think the leaks might be that will make bubbles.

Step #2. Prepare a super advanced hi tech leak detector solution pad. I.E. fold up a piece of paper towel, and soak in the solution.


Step #3. Apply the solution to the points where you think the leak may be...

The joint pictured above isn't leaking, if it was, there would be bubbles coming out. Sorry I didn't think to take pics before I sealed it...

Once you have found your leak, assuming it is like mine, at the joints, disassemble the joint, remove the pipe thread tape. I used a brass bristle brush to clean the threads, and insured NO tape had gotten into the tubing / airway. Then apply a thread compound to the male threads being careful to avoid compound in the airway, reassemble, apply pressure and retest. Repeat until all leaks are no longer, well, leaking...

I followed this process yesterday, and have held steady pressure since then.

I still have no clue what caused the drain valve on the filter to open up the way it did, but that has not recurred. Sadly Harbor Freight has no manual available online for the filter, however it appears that it tightens counter clockwise, and loosens clockwise, apparently it was just loose enough that the action of the air through the filter opened it up and dumped. I am being VERY careful to NOT keep my compressors powered up just in case though... 

I have all the hose joints from the big compressor, to its coupler and reducer tot he Tee, and the feed line for the reel, not to mention the coupler at the tee for the small compressor done. I may have to go back and simply do all of the joints eventually, but so far no real need...

With what I know now, if I were to start another air plumbing project, I would not consider, nor do I recommend anyone use teflon tape for pressure applications. 

My next addition to the shop is going to be anti fatigue mats. I find myself diagnosed with Plantar Fasciitis which is inflamation / damage to the big tendon that runs from the heel to the ball of the foot, and no small part of the cause is quality time on concrete. I wanted the bright red Craftsman anti fatigue mats, but at the cost, and lack of availability I am planning instead on going to Home Depot to get a few of the Traffic Master Anti Fatigue mats for a bit over 1/3 of the cost of the Craftsman mats, only difference is color, and the lack of the Craftsman logo. Big whoop. I will put one between the workbench and miter saw, one in front of the table saw, and one by the band saw / mortiser. 

I will need a smaller one to put in place by the router table / wing. I may just move the lathe mat back and forth when I use the router...
 

09 April, 2014

Dealing with the pressure and giving it the final touches.

So I added the final touches to the hose routing for the plumbing of the hose reel / compressed air system, and fixed the issues I found. It was easier than I thought it would be, but took longer than it should have...

First things first, the shop light was in the way, and needed to move. The remaining 2x2 cutoff from the clamp rack project was just the right size. All I needed to do was size up where the hose was to pass through, where the screws went through, and drill the holes, and screw it together...

The attaching to the ceiling part was a bit of a challenge due to the messed up framing around the attic stairs and the major sag that has caused in the ceiling sheet rock. But I digress...

The hose pass through required a 3/4" hole, centered in the 2x2, I needed a bit that would do the job. I opted for my Irwin Speed Bor Max 3/4" auger bit. It made VERY fast work of the hole, and made for lots of chips, and a clean hole...

Once I overcame the sheet rock sag problem by running a few sheet rock screws with #10 fender washers to cinch up the drywall, and then installed the light, I was able to easily route the hose through the wooden spacer hole, and then added one last hose clamp securing the hose to the reel mount board.


Once I reconnected the hoses, and pressurized the compressors, the funny sound was back, and the pressure was dropping, FAST... A quick soapy water leak test showed the sqealish noise was actually a very fast air leak through the threads of the check valve. I took that apart, and unwrapped several wraps of teflon tape, reassembled and retested, that leak is gone, but I have one now at the quick coupler feeding the reel. I believe it is the tape at the joint as well... I will fix this as son as I can find teflon pipe thread compound as I am DONE with teflon tape, to finish this up... 

If you have been following the blog for a while, you may notice that I lost one of the bicycle hooks that I had been using to store my painting extension poles. I need to rethink that storage arrangement, I had to use the stud that this was attached to in order to mount the lamp.

Sharp readers may also notice that I have not painted the ceiling yet. And there is a good reason for that. Eventaully I will have to tear down the sheet rock, the attic ladder, and the framing around the attic ladder. You may notice the droop on the left side. I may get up there and snap some shots of how this was built. The original builder literally left the left side of the frame just dangling in the air. There is no support, no straps connecting it to the trusses. No solid connection other than air and drywall... I am going to try to limit the repair work to the space inward of the ladder assembly so the front of the garage isn't impacted, THEN I will repaint the ceiling. Probably paint the mount board and spacer mount board for the reel, and shop light at that time.

Very little shop time, and a problem found in the air system.

For starters, I should mention I left the compressors, like I usually do, off. And yesterday was a full rich day at work, followed up by some quality time at the gym, in turn followed up with some even higher quality time in the Gym hot tub... But I digress...

I didn't get back home and into the shop until about 8:30 last night, which doesn't slot me very much working time. Even with the insulation, I am still cautious about my noise levels at night, although the one neighbor it would impact I really would LOVE to get NOISY and keep his worthless tail awake at 2:00 A.M. when he has an important meeting the following day... oops I digress again...

Anyway, so I get out to the shop, and prep 3 more of those shop made hose retaining clamps to finish the job up, when I notice something...

There is no pressure in the line...

There is no pressure in the tanks either...

Go through the checklist...

Breakers on or off? On. Okay.
Compressors on or off? Off.
Did I drain the tanks? Check valves, nope, water runs out. Oh great...

Run the compressors both up to pressure, listen for leaks, Nothing... WTH?!

Power both compressors off, drain tanks.

I suspect that, since there may be some sort of action / intentional leakage caused by the check valves, OR the other possibility...

I had left the blow gun on the bench, laying on the handle. I may have had just enough of an opening in the blow gun valve to bleed both tanks dry in the 20 hours since I last looked at it...

What I know...

#1. Pretty much every component of the system from the compressor to the blow gun has tested good recently, and all pipe thread fittings have been given at least 3 wraps of Teflon tape to insure a leak free fitting...
#2. Since adding the check valves, there is a weird noise that comes from the check valves themselves. Sort of like regular pipes moaning... Maybe I should probably pressurize the system and take an audio clip of it for you to hear... I need to think on this a bit...
#3. The main suspect here is the regulator / filter drain valve. It was open when I got to it. I am pretty sure this is where the actual issue was. What I don't get about it is everything was regulated to 125 PSI or lower, the filter / regulator assembly is fitted with a 160PSI regulator / gauge.and I have been feeding it 125 PSI which should have been fine, I was well away from the "Red danger zone" on the gauge. HOWEVER I am reading the specs on it, and I think I see my problem. max rated pressure it would appear is 100 PSI.

I need to dial back the regulators on the compressors to just at / shave under 100 PSI. Good thing all of my tools are rated to 90PSI or less!

So once I came to the conclusion that I had figured out what I did wrong (dummy read the gauge, not the manual!), and got THAT sorted, and of course moved on to my maintenance items, I was back at the bench, with snips, vise grips, and a drill handy, fabbing up the last 3 of the hose retaining strap clamps to finish up the hose installation.

08 April, 2014

Dealing with the pressure, and making do when I can't find what I am looking for...

The loose dangly feeder hose from the regulator to the hose reel bugs me, a lot... So last night I decided to do something about it... And well... attach it to the wall / ceiling and keep it from drooping into my head while getting into the mechanics toolbox...

Do you ever just KNOW you had something, but you have no clue where you put it?

I was that way last night, actually sort of still am...

You see I just KNOW I have 2 partial rolls, somewhere in that shop, of the plastic plumbers strapping. I figured since I mostly used the stuff for my dust collection ducting, it would be by my surplus dust collection pieces...

Nope.

In the totes with the drywall stuff maybe?

Nope...

Well long story short, I looked high and low and just couldn't locate the stuff... So I did what comes naturally...

I made a substitute.

In my digging I found a nice, big, heavy duty zip tie. It must have been from the compressor pallet or something because this sucker was huge. Probably 3/8" wide x 30" long...

So I roughly sized up the pieces I needed, some tin snip action here, a little drilling there, and loop it around the hose and screw through the sheetrock into the stud and we are golden!

The vertical only took 2 improvised clamps to secure it.

The very simple improvised clamps. I know this is not
the designed function of this zip tie, but it sure works well!

Going across the ceiling is more of the repurposed zip tie and screws!

I am not completely done with this yet, I still need to drop the shop light down so that the hose can run over it. Once that is done, I have 3 more clamps to fab up and install, and this project is DONE! 

So far in use, I can say that the hose reel has functioned actually better than anticipated. It pays out hose smoothly, and easily, and with a tug past the catch, it retracts smoothly and predictably. 

All pnuematic tools I own have been tested against this rig, even the Earthquake Impact, and everything works as expected.

On to the next item on the list!

07 April, 2014

Nuts, and bolts oh my!

I mentioned previously that I needed to get my truck up on a vehicle hoist to take care of a major transmission leak. Well...


So far I have...

#1. Disconnected the battery.
#2. pulled both the front and rear driveshafts (after marking their positions).
#3. Removed all electrical connectors from both the transmission and transfer case.
#4. Removed the access plate.
#5. Disconnected / removed the linkages from both the transmission and transfer case.
#6. Disconnected the cables to the starter.
#7. Removed 1 torque converter nut. Yeah I said nut. They go the opposite way of GM converters and use studs attached to the converter, and nuts instead of converter bolts...
#8. rounded off the corners of the 2nd converter nut.
#9. Removed the 2 starter bolts that the manual says to remove. The starter is still quite solidly mounted.

It was at this point it was well after dark, and the rain started in on me so I had to wrap up for the weekend. I have the following remaining to go.

#1. Remove the remaining starter bolt if I can figure out how, it is in a funny position, the top of the starter. it almost runs into the motor mount, I need a socket / extension setup that is "just so" length wise to get that dumb bolt.
#2. Remove the starter.
#3. Proceed to complete removing the converter nuts, working through the starter hole instead of the access port, MUCH more room to work.
#4. Place jack(s) in place, and unbolt tranny / T case and exhaust from crossmember, remove crossmember.
#5. Remove tranny to engine mounting bolts.
#6. Remove dipstick and tube.
#7. Separate tranny / transfer case from engine, lower and move onto stand.
#8. Thoroughly clean inside of bell housing.
#9. Remove torque converter, pump seal and bushing, and most likely pump. Replace O rings, seals, and bushing.
#10. Clean inside of bell housing again.
#11. Prime new torque converter and re-assemble. Using new torque converter nuts.
#12. Drop tranny pan. Let drain.
#13. Mark, and drill for drain plug kit.
#14. Hand pan and plug kit to BIL to have female threaded piece fully welded into pan.
#15. Drain fluid from transfer case.
#16. Reassemble tranny pan using new filter.
#17. Refill transfer case.
#18. Replace fuel filter.
#19. Fill transmission.
#20. Reconnect battery.
#21. Start engine, cycle through gear shift both tranny and T-case.
#22. Top fluids off, and check for leakage.

By the time this is all done, I should have a well fixed, and reliable truck.

04 April, 2014

Running 2 different size air compressors in tandem. Plumbing done!

I have the plumbing for the dual air compressor setup done, based on 3/8" rubber hoses yes, but it is what I have to work with, and I am not ready to solder copper pipe for this yet, or cut and thread black iron... Like I have mentioned previously, if / when I experience a hose failure between the filter, and the reel, THEN I will upgrade to, well most likely copper pipe. 

Each compressor is plumbed via a 3/8" pnuematic hose, the 29 gallon compressor using a 3' 3/8 hose, the 8 gallon using an 8' "Remnant" 3/8" air hose, both are fed via quick disconnect to a 1/4" F NPT check valve, in turn this is attached via a 1/4 to 3/8 M-M reducer, and fed into a 3/8" brass tee, 3/8" brass nipple and then fed into the regulator / filter / water separator is the Central Pnuematic #68232

On the outlet side of the regulator another 3/8" brass nipple is used and a 3/8" tee, then more 3/8 to 1/4 reducers, to quick disconnects. The upper feeds the hose up to the hose reel, the lower is at the ready for connecting a second hose if so desired.

I was unable to find the clamps to secure the hose, however I figure I have a bunch of plastic hanger strap, I will figure SOMETHING out... I will probably have to try a different Home Depot. I was honestly looking for a bag of 1/2" EMT conduit straps to do the holding job, they just happend to be sold out.

I should mention all connections were treated to a generous portion of teflon tape, and I made extra certain that there was no way excess teflon tape could possibly get into the air stream... When I took the outlet side connectors apart it became painfully obvious that I was the cause of my clogged impact gun. 

From what I can tell, it appears I managed to get a couple of extra wraps loose in the air stream after the connection was made, probably just had some extra over the end, being too tired to notice and it worked its way loose, down the hose, and into the gun.. 

I think moving forward I may venture out and get the teflon paste instead of tape to insure I don't do that again...

As you may recall I have 2 Central Pnuematic 2 HP oil lubricated air compressors. A direct drive 8 gallon that I purchased in I guess it was 2009, the model is similar to the current version with the exception that mine has a large plastic handle instead of the steel tube of the newer model. Honestly I don't care either way, both work...

The 8 gallon compressor peeking out from underneath the 
dust collector stand. Not pretty, but very functional!

Specs on it are...

8 gallon storage capacity.
125 Max PSI.
4.4 CFM @ 90 PSI
5.5 CFM @ 40 PSI

The second, and larger model is the belt driven #68127 that is still the same model that I picked up in 2009. I did a LOT of comparison shopping when I was looking for compressors, and this beat out all similar large portable compressors in performance except for the Ingersoll Rand 30 gallon, and that one was priced out of my league.

29 gallon Central Pnuematic 2HP 150 PSI compressor
parked in a niche created for it behind the mortiser.
Those green hoses are stashed away for now.

Specs on it are...

29 gallon storage capacity.
150 Max PSI.
5.9 CFM @ 90 PSI
7.3 CFM @ 40 PSI

While I understand there will be some line losses from running a dual configuration, from what I have been reading, and depending on which engineers you believe, either my gain in airflow will the the additive sum of the CFM ratings of both compressors minus approximately 1% for losses due to line friction. Others put that number at 10%, while others still claim I should only see a 10% gain off of the larger of the two compressors. I have no real way of verifying this, however I would suspect that the truth would be closer to the 10% loss number, not counting storage capacity because, if anything we add extra storage in the hoses, so if we do the math.

Must be regulated to 125 PSI max so as to not exceed the output of the smallest compressor.
10.3 CFM @ 90 PSI - ~10% so say 10 CFM @ 90 PSI
12.8 CFM @ 40 PSI - ~10% say 11.5 CFM @ 40 PSI

If indeed that is the case, then there really isn't anything I am likely to run off of my air system that would come close to challenging this setup.

To test as best I could the rig, I set the big comrpessor's regulator to about 123 - 124 PSI, to kick on just barely before the 125 PSI regulator / max pressure for the 8 gallon compressor. 

BOTH compressors are connected, and on. I held the blow gun wide open, allowing the large compressor to kick on, and then the small one. I allowed them to run until they kicked off, so I know the combined effect at least was able to compensate for the flow of the blow gun..

So all in all, I am happy as I can be with this setup. Aside from needing still to secure the overhead hose, and that will come. Likewise I should have the issues with errant junk in the lines completely solved at this time, so no more jammed up air tools!

Looks like a science experiment, but so far so good!

I am not going to lie, I would LOVE a Maxair C5160V1-MAP 170 PSI 60 gallon 5 HP compressor, and it IS possible I could figure out a way to make it fit, I would have to either narrow down the library cabinet cutting into precious storage space, or move the dust collector somewhere. I am not ruling either out for now. But as it sits, I am honestly not sure what I could possibly want to run pnuematic tool wise that my current rig won't handle.

03 April, 2014

Fixing the tech... Swapping out a bad motherboard only to find the new one doesn't support legacy drives.

So my Windows 7 system at home is a fairly basic box. I did however swipe the internal DVD drive for use in my SFF CentOS 6.x iSCSI target ssytem. Right now I don't recall why I needed SATA there, but I digress...

So the internal DVD RW in this system is a fairly old, but lightly used PATA DVD+-RW drive. No big deal, all motherboards still have at least one legacy PATA controller onboard right?

Bad assumption. And the worst part is, I already have boxes with these exact motherboards in production that I built. I should KNOW what is on these boards!

But now I am a bit of a dilema. I still use the DVD a lot for burning iso images and such, not to mention loading the new mainboard drivers / video drivers etc...

So I need to either swap out the DVD drive with a new SATA drive, or I need to swap in a PATA controller.

Good thing I have a pile of old legacy hardware that should be compatible, because I am not a huge fan of any of the drives that Frys currently offers, and I don't want to wait for Newegg, Amazon, or any of them to ship...

So tonight comes the operation. Dig for the controller in my long retired AMD Athlon 1400 box that used to run Mandrake Linux. Yeah Mandrake. It hasn't been used in THAT long..., and swap the controller in. It is a HighPoint RocketRAID 404 card. A RAID controller sure, but I know that it can be used for single optical disks as well. I have used it before with IDE DVD drives... so it should be fine...

The worst part is, this whole motherboard swap might have been for no good reason at all. I was having some thermal shutdown / video RAM artifact problems with the prior board, that had integrated video. I ordered the board, and when I pulled the side of the case off, which I had somehow though I had done prior but obviously not, I found some seriously nasty dust / cat hair literally clogging the CPU cooler and the heat sink on the video chip... Some gentle persuasion out in the shop with that freshly installed air hose reel, and my old blow gun would have taken care of this in short order, but it was already too late, I had begun the work...

The good thing here is that I now have a free board that I simply need matching memory, CPU, and power supply for, and I can give my CentOS iSCSI target host a serious upgrade...

02 April, 2014

Getting the jobs off the bench. Making progress and shifting gears from wood to auto repair...

I did some reading of my own blog. I kind of wonder if anyone else does that. I do it to see if I actually enjoy reading what I write. I am probably under the false impression that if I like it, you will like it, but it is the only measure I have available... Anyway I read the what's on my bench thread, and realized I had most, not all, but most of it done...

The hose reel is up, I have abandoned the ganging project for now. May pick it up later, but I kind of doubt I need to at this point... I am more and more convinced the performance problem was a blockage caused by an errant piece of teflon tape.

The planer sled has been moved. I didn't mention it in my prior post, but I am making a quick & dirty storage box for the hot glue gun. Just a basic nail and glue pine box, I am going to relieve the edges, put a piano hinge on it and paint it gloss white. The primary use for the hot glue gun is my wife's craft projects, so I wanted it more indoor stuff. I was going to let her have some fun with her stencils and figured the gloss white latex would give her a good base to work with... Once the glue dries, I relieve the edges, sand it and then apply the paint. Once the paint is dry I apply the piano hinge, and a catch.

Shop cleanup is mostly done. Still need to fold and stow the drop cloths my bride put into the shop, and sweep, but otherwise I am good to go.

The false drawer front for my college friend is done, waiting to be picked up. I think I will charge him 1 Shiner Bock and he picks up the tab for the pool table on the next guys night out...

Lastly the miter saw stand drawers.. I admit I am making no progress on them. I need to, I want to, but it has been very low on my priority list...

I am prepping now for several auto repair jobs. These include.

#1. Swap torque converter, front oil seal & bushing as well as the pump seal & O ring on my F150 4x4. I will be adding a B&M pan drain plug, and changing the fuel filter while it is on the lift. I have all the parts and supplies I need for this job.
#2. Swapping out the AC Compressor Clutch, Power Steering Pump, Water Pump, idler and tensioner pulleys and belt on my Saturn SL2.  The clutch, PS pump, and belt have arrived. The rest is ordered. I need to get some Anti Freeze for this job, but other than that, once the truck is on the road again, I start in on the Saturn...

I took today off so that I could rest up from working some insane hours over the last few weeks. I really think I need to just find a comfy spot on the sofa, and enjoy some streaming shows. Maybe catch an episode of New Yankee Workshop or something...

01 April, 2014

The reely big issue taken care of... Mostly.

A fellow BT3Central / Sawdustzone member and admin Loring Chien (LCHIEN) had a post recently regarding how he hung his Harbor Freight self retracting air hose reel solo, got me to thinking, it really shouldn't be difficult, but you know sometimes should and are can be totally different...

Well, Lorings install thread, me literally tripping all over my existing hoses when trying to run the hose out to the driveway, and a Harbor Freight coupon for the reel in question pushed my motivation to 100%, and I grabbed a reel for myself.
And yes, I admit it. I have been eyeballing one of these since I first thought about getting an air compressor. My experience when I was a much younger man working as a mechanic in shops that had these hose reels convinced me of the utility, and safety benefits of self retracting hose reels. I worked in one shop that was not so equipped and it was a miserable experience trying to work around my hoses...


After much consideration and an attempt to gang 2 compressors together that isn't fully abandoned yet, I have decided to at least temporarily borrow the 8' all rubber 3/8" hose that was attaching the 2nd compressor to the system, and remove the tee that connected them all. I went instead with a single compressor connection.

So the first thing I had to do was fab up a simple mount board. I centered the reel on the board, marked the location of the holes for the mounting bolts, measured off where the holes for the lag bolts to hold this up on the 16" OC studs that my house should have, and got to drilling. I countersunk the back side of the mounting bolt holes so that the heads for the carriage bolts don't sit proud of the mounting board.

For mounting hardware I used 1/2" x 2" nickel plated steel carriage bolts, plain washers and nuts. I left the washers and nuts on the bolts that the slotted holes would be in (the front of the reel in my case), and went to hanging the mount board.

I found the first stud, approximated the center, drilled my first pilot hole, and ran the first bolt, I squared up the mount board in relation to the walls, and drilled the pilot for and ran the second bolt, Then I drilled for the first of the bolts in where the second stud should be...

Problem.

It appears the truss members / studs whatever you want to call them, for my roof / ceilings are NOT 16" OC like I expected, but rather, 19" OC that I verified with a tape measure after cleanly missing the wood by a couple of inches.

So I had to transfer my measurements, and move the lag bolt holes closer to the ends, so that they are 19" between, and then remounted it all up...

So now I have a nice mount board, pulled up nice and flush against ceiling drywall that HAD been sagging off of the trusses. Yeah that needs to get fixed, but I digress... so the mount board is there, and nice and tight.

I was fearing from LCHIEN's description, having trouble getting this up there, but installation of the reel itself couldn't have been easier. It went thus...

#1. With the mount board installed, and the 2 front washers / nuts on but run almost to the falling off point, maybe 3 threads run in, I placed the other 2 nuts and washers on top of the ladder.
#2. After hauling the reel up the ladder, I grabbed the reel by the frame, not the spool part, and slid the slotted holes over the washers / nuts / bolts, then rotated it such that the full holes slid over the other 2 bolts.
#3. with my shoulder, I simply kept pressure on the front of the reel keeping it up against the board, keeping it on the bolts.
#4. I then put the outside washer and nut on so that I had 3 supports. I ran those 3 nuts in finger tight.
#5. I then added the 4th washer and nut, ran it finger tight.
#6. I then snugged all 4 mount bolts up tight with a combination wrench. No there is not enough space to get a ratchet / socket in there. The 2" carriage bolts barely clear. I probably should have used 1.5" but these will do.


#7. Lastly, I changed out my plumbing. 50' blend hose is gone, in its place is the 8' rubber hose, connected via quick connectors, threads sealed off with plumbers tape. And only the 3' whip from the 29 gallon compressor is feeding the regulator / hose / hose reel. I have mentioned elsewhere. If you are tempted by the light weight of the PVC / Rubber blend hose, resist temptation. These things are JUNK!

I just need to tidy up the feeder hose routing and it is finished, 
until I decide to hard plumb it!


I have plenty of hose with that 8' hose, I need to make some final changes that include changing the mounting config of my shop light from direct ceiling mount to chain mount. Which means i need to find the chain for this... And I need to come up with some sort of clamps to secure the hose to the wall and ceiling.

While I had considered the keyhole slot approach, I found that I really didn't need to go to that much effort.

If you are considering adding one of these to help manage your air hose, and are concerned about one man installation, don't be, it was far easier than I had originally thought, the weight / ackwardness of the reel as it was being installed was really quite easily manageable even for someone with back problems.

I may have mentioned before the reason I was trying to gang the 2 compressors together in the first place, which is incredibly poor performance of my Harbor Freight "Earthquake" impact wrench. I may have also mentioned my attempt to fix that thinking the problem might be the gun itself. Let's face it, impact wrenches don't run all the time, just short bursts, the 8 gallon should have been able to handle it by itself... So I literally dropped in as much air tool oil as it would let me put in, and I let it soak, overnight. The next day I plugged the impact wrench in, and with a paper towel / rag just behind the exhaust port to catch the oil, I ran the impact wide open, it spit, choked and sputtered at first, spit out a piece of what I thought might have been white protective plastic... Well it occurred to me last night what that "plastic" might have been...

You see I kind of wondered due to the finish being off of the inlet threads if my particular gun was one somebody returned to the store... I bet I know what happened...

I bet they screwed up applying teflon tape to the threads, got a piece sucked into the inlet and jammed it up not allowing the gun to breathe...

I have yet to put it on a bolt, but I can say that before the junk blew out of it, I could easily hold the gun with a few fingers and pull the trigger with no reaction. Now when I pull the trigger the gun tries to torque itself out of my hands... I need to verify on a stubborn bolt, but I think I have the issues with the impact wrench sorted out.

I have heard from several folks telling me how I should be using hard line, at least 3/4" and a shorter reel. And while I appreciate their expertise in the area, for my application I don't see that happening, at least not right now. The 50' hose / reel stays put for sure, I got it for the express purpose of being long enough to not only sufficiently supply air power to my shop, but also be able to reach the far corners of my driveway for doing things like changing out struts on the car etc...

Admittedly this 50' hose is a different one from the ones I used previously, but thus far I have succesfully used with this comrpessor and 50+ feet of 3/8 hose...

3/8 pnuematic ratchet.
Air hammer.
air powered random orbital sander. Not mine, but I am going to buy one of them soon. I need to do some wet sanding and water + electric sanders is bad news...
Framing nailer
Finish nailer
Stapler
Pin nailer
HVLP gun
1/4" die grinder.
Siphon feed / conventional spray gun.
1/2" impact wrench tenative to like I said, getting this on a stubborn bolt.
Various blow guns.

There are a few tools I don't have that I want that are pneumatics.

Angle head air drill.
Air powered random orbit sander.
And if I can find one in good shape for dirt cheap money used. A paint shaker... I really can live without that though. Just keep using a mixing paddle on a drill rig and it works fine...

If my rig works the way I want it to, it might not be "right" by why fix what isn't broken right?